


2
Lookforthissymboltopointoutimportantsafety
precautions. It means – Attention!! Become
alert!! Your safety is involved.
SAFETY RULES
Anypowerequipmentcancauseinjuryifoperatedimproperly
or if the user does not understand how to operate the
equipment. Exercise caution at all times when using power
equipment.
1. Read this owners manual and your vehicle and sleeve
hitchownersmanualsbeforeusingthisblade.
2. Donotallowchildrentooperatethevehicleorblade.
3. Donotallowadultstooperatethevehicleorbladewithout
proper instructions.
4. Donotallowanyonetorideontheblade.
5. Beforeloweringandoperatingthe blade,besureno
one is near the area of operation.
6. Lowerthebladewhenleavingvehicleunattended.
7. Vehiclebrakingandstabilitymaybeaffectedwiththe
attachment of this blade. Drive slowly with blade in
transport position. Stay off of steep slopes.
8. Stopandinspectfordamageafterstrikinganobject.
Repairanydamagebeforecontinuingoperation.
9. Keepallnutsandboltstightandbesuretheequipment
is in safe operating condition.
10. Always lock the tractor lift handle down when installing
orremovingthebladefromsleevehitch.
OPERATION
Theboxscraper/graderblademaybeused forscraping
andlevelingofgravelandlooseorlightlycompacteddirt,
forbackllingandforsnowremoval.Forimprovedtraction
use wheel weights and/or tire chains.
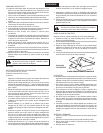
1. Topivottheblade,raisethesleevehitchsothattheblade
is off the ground. Remove the pivot lock pin to rotate the
bladetooneofsixsettings.
2. Forbackllingorremovingsnow,thebladepositionmay
bereversed180degreesandthescarierbarandthe
boxendsremovedfromtheblade.Donotbackblade
into piles of snow or dirt at high speed.
3. Donotremovethescarierbariftheboxendsareto
remainattachedtotheblade.Toplacethescarierina
non-workingposition,turnitupsidedownandre-attach
totheboxendswiththeclevispins.
4. Drivethetractorataspeedwhichtsconditionsand
thetypeofworkbeingperformed.Whenlevelingwith
theblade,aslowerspeedwillallowloosematerialtobe
more evenly deposited in low spots.
Refer to your sleeve hitch owners manual.
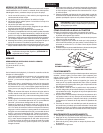
1. Attachthebladetothesleevehitchonyourtractorusing
the sleeve hitch pin.
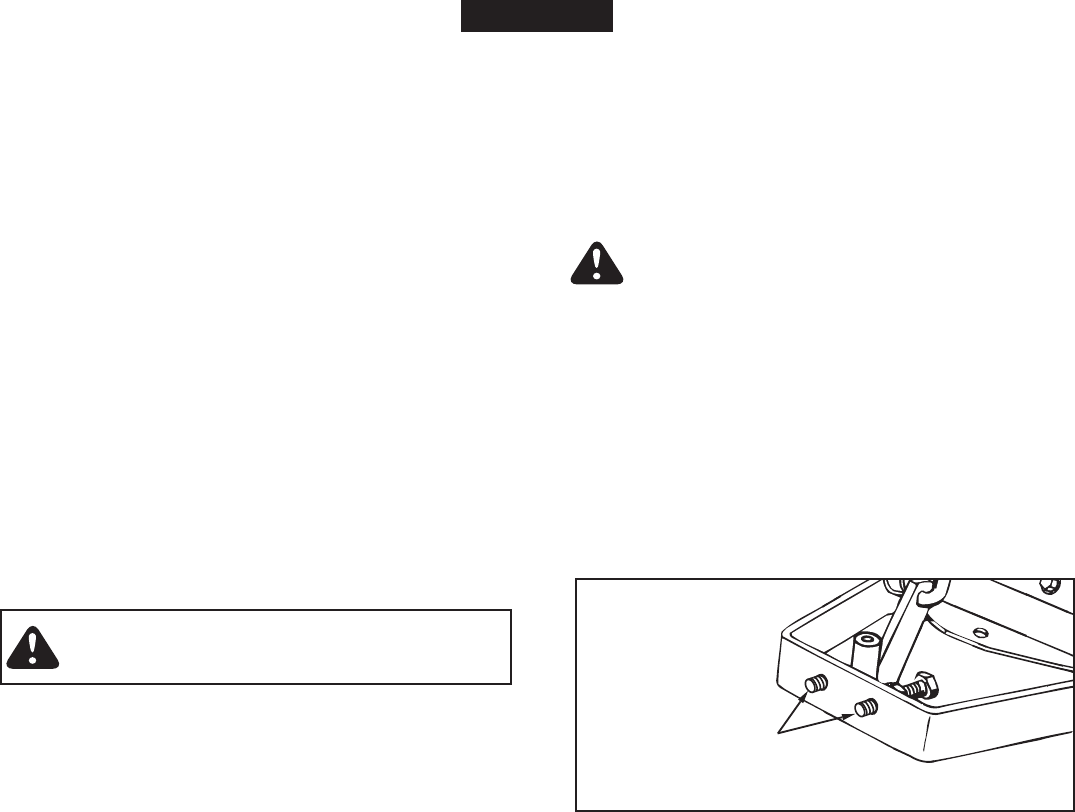
2. Tightenthetwostabilizerboltsandjamnutstoeliminate
looseness in the hook-up.
3. Adjustthesleevehitchsothatthebladeisfreetogo
belowgroundlevelbutcanstillberaisedaminimumof
5"abovegroundfortransport.
4. Thestabilizerboltsandjamnutsshouldbeloosened
beforeremovingthebladefromthesleevehitch.
CAUTION: Lock tractor lift handle in down position
when attaching or removing blade from sleeve
hitch.
STABILIZER BOLTS
TRACTOR SLEEVE HITCH
ATTACHING BLADE TO TRACTOR
TOOLS REQUIRED FOR ASSEMBLY
(1) 1/2"Wrench
(2) 9/16"Wrenches
(1) Pliers
ASSEMBLY
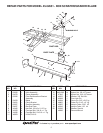
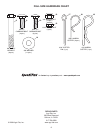
Refertoillustrationonpage6andfullsizehardwarechart
onbackpage.
1. Assemblebothendplatestothebladeusingfour5/16"x
1"carriageboltsand5/16"nylocknuts.Do not tighten
yet.
2. Assemblethescarierbarthroughtheslotsintheend
plates.Securethebarwithtwo3/8"x3/4"clevispins
and two 3/32" hairpin cotters (small). Tighten the four
boltswhichfastentheendplatestotheblade.
3. Assemblethepivotreinforcementbracketassemblyto
thebladeusingfour3/8"x1"carriageboltsand3/8"
nylock nuts. Tighten.
4. Attachthehitchassemblytotheframeusingve3/8"
x2-1/2"hexbolts,ten3/8"atwashers,andve3/8"
nylock nuts. Tighten.
5. Holdtheclevisbracketsothatthealigningholeisat
thebottom.Inserta3/8"x2-1/2"hexboltthroughthe
centerholeintheclevisbracketandthenthroughthe
center hole in the rear of the frame. Secure with a 3/8"
atwasher,and3/8"nylocknut.Do not tighten yet.
6. AssembletwoU-boltsaroundtheframetubeandthrough
theclevisbracket.Assemblefour3/8"nylocknutsonto
theU-bolts.Aligntheclevisbracketsothatitisstraight
with the frame and tighten theU-boltsandthecenter
hexbolt.
7. Assembletheframetothebladebyttingthe clevis
MAINTENANCE/STORAGE
1. Checkforlooseboltsaftereachuse.
2. Rotatethebladetoptobottomwhenwearalongbottom
edgehasbecomesubstantial.
3. Removealldirtandrustandtouchupwithpaintbefore
storing.
4. Store inside a dry area.
bracketdownontothepivotrod.Placethespecialwasher
ontothepivotrod,thenassemblethe3/16"x2"cotter
pin through the pivot rod.
8. Place the pivot lock pin down through the holes in the
clevisbracketandpivotplate.Securethepivotlockpin
with the 1/8" hairpin cotter.
ENGLISH