4
Operating Instructions:
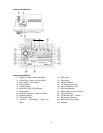
NOTE: Number in parenthesis (#) corresponds with “Control Identification” on page 3.
Note : Power can be turned on by pushing any button on the front of the AWM950.
LIQUID CRYSTAL DISPLAY PANEL
The liquid crystal display (LCD) panel displays the frequency, time and activated functions.
Note: It is characteristic of LCD panels that, if subjected to cold temperatures for an extended period of time,
they will take longer to illuminate than under normal conditions. In addition, the visibility of the numbers on
the LCD may slightly decrease. The LCD readout will return to normal when the temperature increases to a
normal range.
TUNER
1) Turn power on by pushing the Power switch /Volume control button (18).
2) Use the Source Selectors (19), select the AM/FM button
3) Use the Speaker Selector Switch(14) to choose speaker output
4) Use the Tuner Up (1) or Down (2) buttons to select station manually. Also, the Station Preset buttons can
select stations (this will be discussed later in the manual). Push either of the seek buttons (1 or 2) to tune
to the next higher or lower active station.
5) Adjust Volume Control (18) to suit taste.
DVD PLAYER
1) Turn power on by pushing the power switch / volume control button (18).
2) Insert an available disc such as DVD, CD, or MP3 CD into the DVD player (12)
3) Use the Speaker Selector switch (14) to choose between speaker output, headphones or both.
4) Press the DVD Play/Pause button (11).
5) You may change tracks or chapters by using the Next or Previous buttons (8).
6) To change to AM/FM or Aux. Inputs, press the corresponding button; to return to DVD press the DVD
button.
8) To eject the disc, press the Eject button(13).
AUXILIARY INPUT
1) Push Power Switch (18) “On”.
2) Using the Source Selectors (19), choose the button labeled “AUX”.
3) If there is an external source (example: CD shuttle or TV audio) connected to the Auxiliary Input Jacks
(22) on the rear of the radio, then you can listen to your external source through the system.
SETTING THE CLOCK
1) Push Power Switch (18) “On”.
2) Press the T/F button (4) to display the clock
3) Hold the T/F button (4) and simultaneously use the H and M buttons (1 and 2) to adjust hours and
minutes.
Note: The T/F also toggles between time and radio frequency on the display.
SETTING STATION INTO MEMORY PRESET
1) This unit has the ability to set 18 FM and 12 AM stations into memory.
2) To set the AM or FM stations into memory, first tune to the desired station.


