


8
Directions for Setup and Use
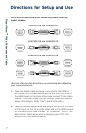
3.
Turn on your TV and your source device.
4.
Plug in the RazorVision AC adapter to a wall outlet or power
console. Insert the DC plug into the DC receptacle on the side
of the RazorVision.
5.
The lights on both sides of the RazorVision will flash for a few
seconds to indicate it is connecting with the video equipment.
When the lights on both sides stop blinking and remain
continuously on, the RazorVision is ready.
6.
Some TVs will auto-detect the correct display source and
you will see a picture. If this does not happen, go to the video
menu option of your display and change it to DVI or HDMI
input. Depending on the TV used, the exact source name
for the digital connection will vary.
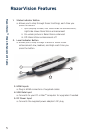
7.
RazorVision can show an image in three ways:
a. Processing off (no image enhancement or modification);
b. Processing on (full-screen image enhancement)—this is
the normal viewing condition; and
c. Split screen (image enhancement off on the left half, and
on for the right half).
To change how RazorVision is showing the image, push the
“Status” button to cycle through the three views. Each button
press will take you one step forward in the cycle.
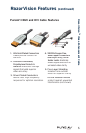
8.
With the RazorVision image enhancement on (in either
split- or full-screen view), push the “Level” button to cycle
through the three levels of processing. Now you can choose
whichever level is best for your TV and viewing conditions,
according to your personal preference.
RazorVision
™
Video Enhancement Cable