


Page 11
724-746-5500 | blackbox.com
Chapter 3: Installation and Configuration
3. Installation and Configuration
3.1 Software Installation
Windows 98/ME/2000/XP/Vista Operating Systems
1. Start Windows.
2. Insert the included software CD into your CD/DVD drive.
3. If “Auto-Start” is enabled, the installation window will automatically appear.
Otherwise, navigate to the root directory of your CD drive and double-click the
“autorun.exe” application to launch the installation window.
4. Click the “Install” button.
5. Type in your part number (IC292A) or select your adapter from the listing.
6. Click the “Install Drivers” button.
7. The setup file will automatically detect the operating environment and install
the proper components.
To confirm that the driver has been successfully installed, click on the “Start”
button, and then select “All Programs.” You should see the SeaCOM program
folder listed.
You are now ready to proceed with connecting the IC292A to your system. Refer
to the Hardware Installation section (below) for details.
NOTE: Windows NT is not USB aware, so it cannot support this device.
3.2 Hardware Installation
NOTE: Do not connect the device to a USB port until the software has been
successfully installed.
To install the IC292A, plug the device into an available USB port using the
supplied USB cable. The following instructions were tested with Windows XP and
may vary based on your version of Windows.
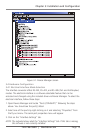
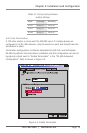
Once the device has been connected, the Found New Hardware wizard will
appear first for the root hub and then for each port that you are installing.
Follow the instructions on the following page to finish installation.
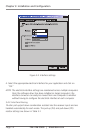
NOTE: The installation will repeat twice for each COM port (a total of sixteen
times on eight port devices). This is a limitation in the way Windows installs
external serial devices.
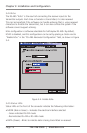
1. Click on “Install the software automatically” followed by the “Next” button.