


43
Time Lapse Video Cassette Recorder
42
Time Lapse Video Cassette Recorder
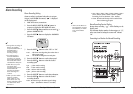
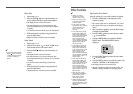
SYMPTOM POSSIBLE CAUSE CORRECTIVE ACTION
Timer recording.
Alarm recording.
Noise in the
playback picture.
The date and
time are not
recorded.
The cassette tape
cannot be ejected
The date and time are not correct.
The unit is not set to timer recording
stand-by mode.
“N” is selected for the TIMER
PROGRAM SET.
“NO” is selected for alarm recording in
the ALARM REC SET menu.
The tracking adjustment is in the
wrong.
The video heads need cleaning.
“NO” is selected for the date and time
in the DISPLAY SET menu.
The date and time go off the ON-SCREEN
by pressing the DISPLAY button.
Problem with the system or tape.
- Set the date and time correctly.
- Press the POWER(STANDBY/ON) button
to display “ ” on the display panel.
- Be sure to select “Y” for the TIMER
PROGRAM SET.
- Be sure to select “YES” for alarm
recording.
- Adjust it by using the manual
tracking.
- Clean the video heads.
- Be sure to select “YES” for the
display.
- Press the DISPLAY button to show the
date and time.
- Unplug the power cord then plug it
back in.
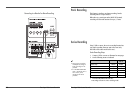
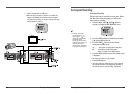
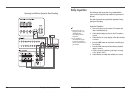
Periodic Inspection and Maintenance
Periodic inspection and maintenance should be referred
to your dealer. If there is noise in the playback picture,
and it cannot be corrected using the tracking
control, it may indicate that the video heads need
cleaning. The video heads should be cleaned and
inspected every 1,000 hours. The video heads usage can
be checked using initial menu, running time.
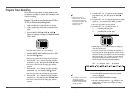
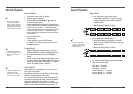
System Down
If the unit does not function at all, try the following.
1 Unplug the power cord then plug it back in.
2 Reset the memory. (Press the RESET button. Under
normal conditions, do not touch the RESET button.)
3 If the problem is not corrected after performing
steps 1 and 2, consult your dealer.
✔
• Press the RESET button for
more than 0.5 seconds to
perform the reset. Running
Time will not be reset.
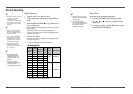
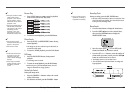
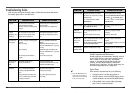
Troubleshooting Guide
If the unit does not operate normally when you follow the instructions indicated in
the manual, please refer to the table below.
SYMPTOM POSSIBLE CAUSE CORRECTIVE ACTION
No power.
No image
displayed on the
monitor TV.
The buttons do
not respond.
Unit will not go
into record
mode.
Autorepeat.
The power cord is not correctly
connected to the wall outlet.
The unit is in timer recording stand-
by mode.
The connections are not correct.
The power to the camera and/or
monitor TV is not turned on.
The unit is in timer recording stand-
by mode.
Alarm recording.
Panic recording.
The security lock(SET LOCK) is
engaged.
The loaded cassette has no
erasure prevention tab.
“NO” is selected for autorepeat
recording in the REC MODE SET
menu.
During autorepeat recording when
there is an alarm input, autorepeat
recording is canceled.
- Connect the power cord firmly into
the wall outlet.
- This is normal, not a malfunction.
- Check that all connections are correct.
- Turn all connected devices power
on.
- Press the POWER(STANDBY/ON)
button.
- Wait for the alarm recording to end.
- Press the STOP button for 3 seconds
to stop.
- Wait for the panic recording to end.
- Press the STOP button for 3 seconds
to stop.
- Cancel the security lock.
- Load a cassette tape with
erasure prevention tab or cover the
tab hole with adhesive tape.
- Be sure to select “YES” for
autorepeat recording.
- Set “YES” again for autorepeat
recording.