


QSC26404 User’s Manual
47
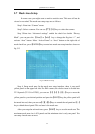
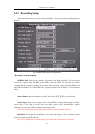
Step 6: Alarm schedule setup: When a view tampering alarm occurs, the DVR will handle
the alarm based on the schedule. You can set 4 periods for each day of the week. You can also
copy the schedule of any one day to other days.
Note: Time periods can not be repeated. Please reboot DVR to make the parameters effective.
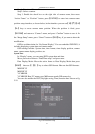
Step 7: Setup alarm policy: If a view tampering alarm occurs in a schedule, the DVR will
respond based on the policy. You can select one or more options including “On Screen Warning”,
“Audible Warning”, “Upload to Center” and “Trigger Alarm Output”. You can use 【↑】【↓】and
【EDIT】keys to enable or disable them. “×” is disabled and “” is enabled.
Step 8: Save alarm setup: After your setup, press the “Confirm” button and return to
“Image Setup” interface. In “Image Setup” menu, press the “Confirm” button to save current
camera parameters and return to main menu.
Step 9: Save all cameras: If you want to setup other cameras, repeat step 2 to step 8. In
“Image Setup” menu, press “Confirm” key to save all cameras parameters. Press “Cancel” button
or【ESC】key to abort.
By selecting the “Off” option for “View Tampering”, you can delete the view tampering area.
Note: Only one view tampering area can be setup for each camera. The view tampering area
can not be copied. If the schedule is modified, you must reboot the DVR to make the parameters
effective.
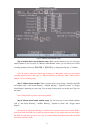
5.9 Video Loss Alarm
If something is wrong with the video cable or camera, the video image may be lost. If you
enable video loss alarm, and this happens, the DVR will send an alarm.
Step 1: Enter into “Camera” menu:
Step 2: Select camera: Use【】【 】keys to select a camera.
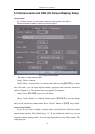
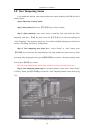
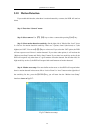
Step 3: Enter into “Advanced settings” interface: Move “Active Frame” to the “handle
method” box on the right side of the “Signal Loss” item, use【】key to select “Handle” option
and move “Active Frame” to the “Policy” button on right side. Press【ENTER】to enter into
“Signal Loss” interface shown as fig 5.16: