


Page 5 Page 6
There are 3 modes for recording:
1. Manual Recording:
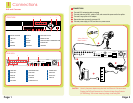
Push the RECORD button on the DVR front panel. It will record until you push the STOP
button. If the system is password protected it will ask for a password to stop recording.
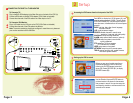
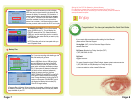
2. Motion Detection Recording:
Go to MAIN MENU. Use the Direction Keys to select MOTION (GREEN box B3) and select
ENTER, this will display the MOTION screen (B4). Add a check mark in the ENABLE box
to enable motion detection for the camera (GREEN box B4). Select the AREA SET option
(RED box B4), and select ENTER. This will display (B5) screen.
B3 B4
B5
In the detection area RED means inactive so
motion in this area will NOT trigger recording. The
transparent area means active, so motion in this
area will trigger recording. Select the All option
(RED box) to make the entire area sensitive, or
select the CUSTOM option (GREEN box) to setup
specic active areas, using Direction Keys, ENTER
button, or USB mouse. Select the SENSITIVITY
option (ORANGE box) select ENTER to change
values: 1 to 8 with 8 being the most sensitive.
Select SAVE to the save settings.
B6
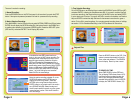
Setup the motion recording schedule. Go to the
SCHEDULE option on the SYSTEM menu to
display the SCHEDULE screen. Select the
MOTION option using Direction Keys and the
ENTER button to put a check mark in the motion
box (ORANGE box)(B6). Select the days and
times for each camera to record on motion, green
means the time is active. Click the OK button to
save the settings.
3. Time Schedule Recording:
Go to SYSTEM menu, use Direction Keys to select the SCHEDULE option (RED box)(B7)
and select ENTER, to display the Schedule screen (B8). If you want to record all the time
(continuous recording), use Direction Keys to go to the ALWAYS option and select ENTER
to put a check mark in the box. To program the DVR to record on a schedule, use Direction
Keys and ENTER to select the days and times for the camera to record motion, green =
active. Click on OK to save the settings. You can setup special recording times on holidays,
see section 3.3.3 for Scheduled Recording in the DVR User Manual for instructions.
B7 B8
Playback Files:
C
C1
Press the SEARCH button on the DVR, if the
system is password protected it will ask for
a user name and password. The SEARCH
box will display. Search by time or event.
TO SEARCH BY TIME:
Select TIME SEARCH option (RED box).
This will display TIME screen shown in(C2).
Use Direction Keys to select the date you
wish to view (the highlighted dates have
recorded les available to view.) Hit ENTER
to display the TIME SEARCH screen (C3).
C2