


Connect the Devices Connexion des appareils
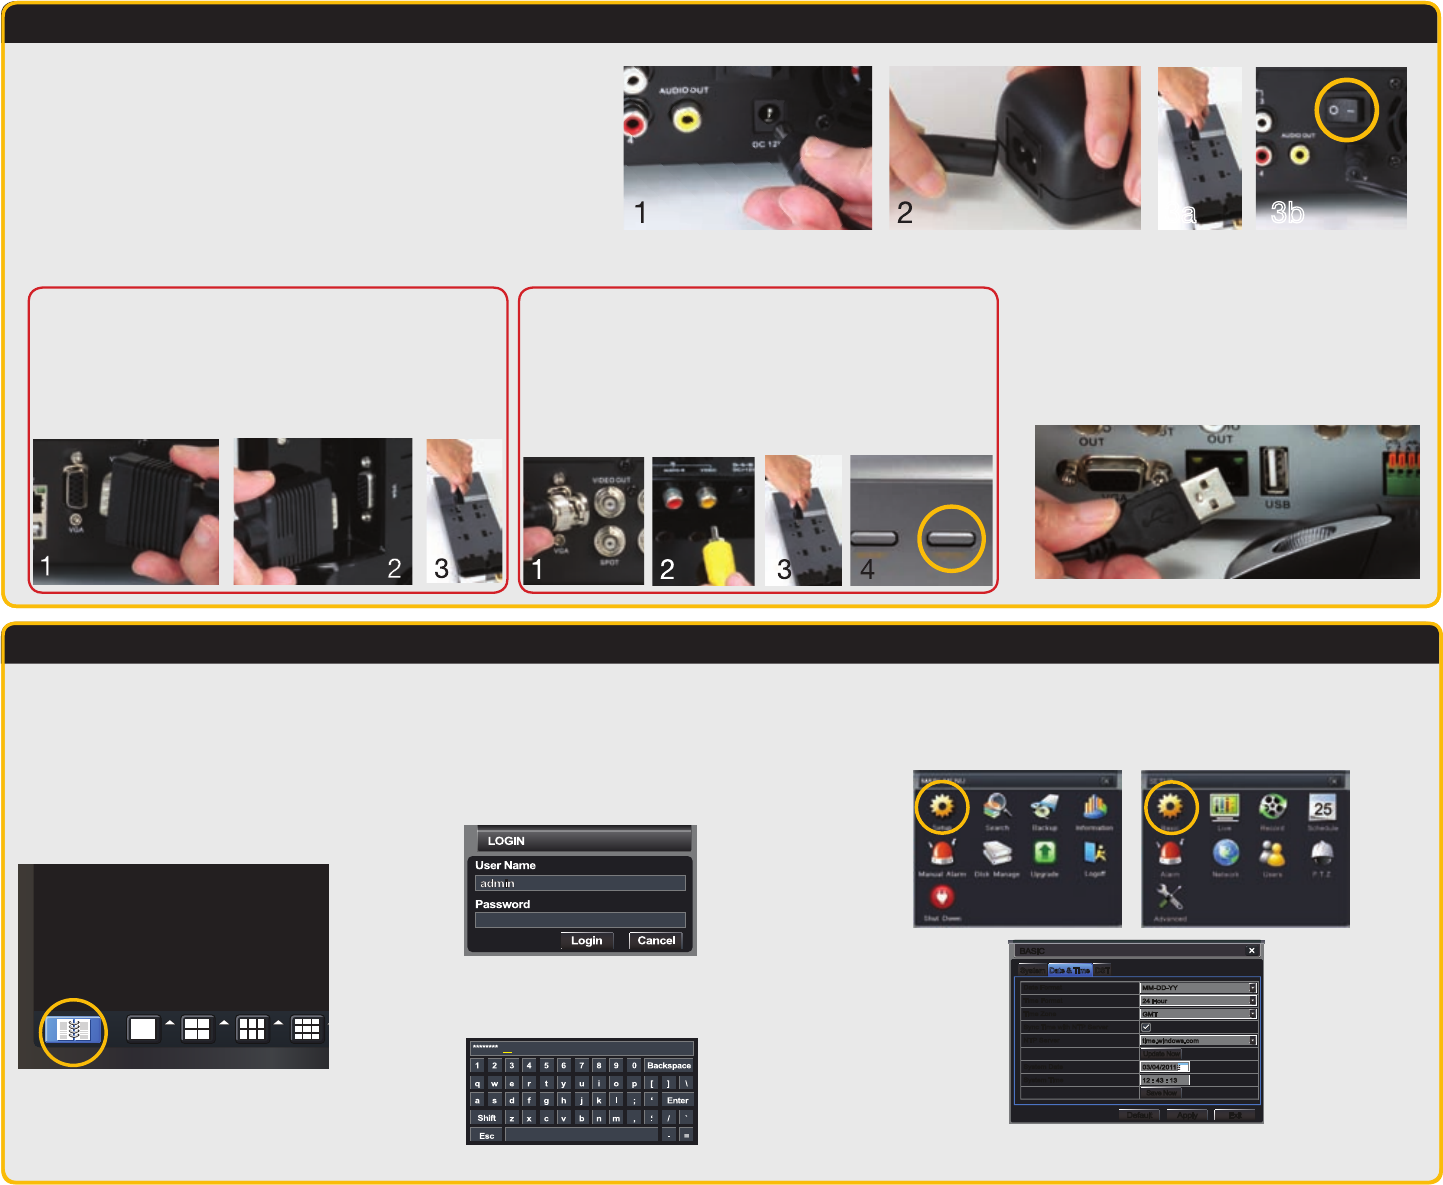
STEP 1 Turning on the DVR
1. Connect the power cable to the DVR
2. Connect the power adapter to the power cable.
3a. Plug the power cable into a surge protector
b. QT428 and QT446 DVRs - Turn on the DVR using the
power switch on the rear panel.
You will hear a beep as the DVR powers up.
1
re
ÉTAPE Mise sous tension du DVR
1. Branchez le câble d’alimentation au DVR
2. Branchez l’adaptateur de courant au câble d’alimentation.
3a. Branchez le câble d’alimentation à un limiteur de surtension
b. DVR QT428 et QT446 - Allumez le DVR à l’aide de
l’interrupteur situé à l’arrière de l’appareil.
Vous entendrez un bip à la mise sous tension du DVR.
Plug the mouse into the port labled “USB”
on the rear of the DVR.
NOTE: the USB port on the front of the
DVR is used for backing up video files.
Branchez la souris au port marqué « USB »
situé à l’arrière du DVR.
NOTE: Le port USB situé à l’avant du DVR
sert à sauvegarder les fichiers vidéo.
STEP 2 Connect to a VGA Monitor or Television STEP 3 Connect Mouse 3
e
ÉTAPE Connexion de
la souris
2
e
ÉTAPE Connexion à un moniteur VGA ou à un téléviseur
3a 3b3a 3b
Connecting a VGA PC Monitor
1. Plug the VGA cable into the port marked “VGA”
on the back of the DVR.
2. Plug the other end of the VGA cable into the
similar port on the back of the monitor.
3. Plug the monitor’s power cable into the surge
protector.
Connexion d’un moniteur PC VGA
1. Branchez le câble VGA au port marqué « VGA »
à l’arrière du DVR.
2. Branchez l’autre extrémité du câble VGA au
port similaire situé à l’arrière du moniteur.
3. Branchez le câble d’alimentation du moniteur
au limiteur de surtension.
Connecting a Television
1.
Connect the BNC-to-RCA cable to the “Video Out” port
on the back of the DVR.
2.
Plug the RCA end into the “Video In” port on the
television.
3.
Plug the television’s power cable into a surge protector.
4.
Press and hold the ESCAPE button on the front of the
DVR for 10 seconds or until you hear a beep to indicate
that the video mode has been changed.
Connexion d’un téléviseur
1. Branchez le câble BNC-RCA au port « Sortie Vidéo » situé à
l’arrière du DVR.
2.
Branchez l’extrémité RCA au port « Entrée Vidéo » du téléviseur.
3.
Branchez le câble d’alimentation du téléviseur au limiteur de
surtension.
4.
Maintenez enfoncé le bouton ÉCHAPPEMENT situé à l’avant
du DVR pendant 10 secondes où jusqu’à l’audition d’un bip
indiquant le changement de mode vidéo.
OPTION A: OPTION B:
Initial Set Up
1. Right-click the mouse
anywhere on the screen to
bring up the Control Bar at
the bottom of the screen.
2. Click on the Menu icon.
1. Faites un clic droit n’importe
où sur l’écran pour faire
apparaître la Barre de
commande au bas de l’écran.
2. Cliquez sur l’icône Menu.
STEP 4 Open
Control Bar
4e ÉTAPE
Ouvrir la barre de
commande
STEP 5 Log In 5e ÉTAPE Connexion STEP 6 Set Date and Time 6e ÉTAPE
Configurer la date et l’heure
1. You will be asked to log in before
proceeding.
1. Vous devez vous connecter pour
pouvoir continuer.
User Name Nom d’utilisateur: admin
Password Mot de passe: 123456
B. Input the required text and hit the
ENTER key.
B. Saisissez le texte requis et tapez sur
la touche ENTRÉE.
A. To enter numbers or characters,
click the appropriate field and a vir-
tual keyboard will appear. Symbols
can be accessed through the use of
the SHIFT key.
A. Pour saisir des chiffres ou des
caractères, cliquez sur le champ
approprié et un clavier virtuel
apparaîtra. Pour accéder aux
symboles, servez-vous de la touche
MAJUSCULE.
Refer to the User’s Guide if you wish to change
this password at a later time.
Reportez-vous au Guide d’utilisation si vous
souhaitez changer le mot de passe ultérieurement.
After logging in, the Main Menu will open.
1. Click on the Setup icon to open the Setup Menu.
2. Click on the Basic icon.
Après vous être connecté, le Menu principal s’affiche.
1.
Cliquez sur l’icône Configuration pour ouvrir le Menu Configuration.
2.
Cliquez sur l’icône Base.
3. Select the Date & Time
tab. Click in the ap-
propriate field and use
the virtual keyboard to
enter the date, time,
and formats you wish
to use.
3. Sélectionnez l’onglet Date
et heure. Cliquez sur
le champ approprié et
utilisez le clavier virtuel
pour saisir la date, l’heure
et les formats souhaités.
To save your settings, click on
APPLY and the EXIT.
Pour enregistrer vos paramètres,
cliquez sur APPLIQUER puis
QUITTER.
NOTE: If you wish to change your language at this
time, you can do so in the System tab. You will have to
re-log in afterwards.
NOTE: Si vous souhaitez modifier la langue maintenant,
vous pouvez le faire dans l’onglet Système. Si vous le
faites plus tard, vous devrez vous reconnecter.
SystemSystem DSTDSTDate & TimeDate & Time
BASICBASIC
DefaultDefault
ApplyApply ExitExit
Update NowUpdate Now
Save NowSave Now
Date Format
Time Format
Time Zone
Sync Time with NTP Server
NTP Server
System Date
System Time
25
MAY
MM-DD-YY
24 Hour
GMT
time.windows.com
03/04/2011
12 : 43 : 13
MM-DD-YY
24 Hour
GMT
time.windows.com
03/04/2011
12 : 43 : 13
Date Format
Time Format
Time Zone
Sync Time with NTP Server
NTP Server
System Date
System Time
IMPORTANT! You must follow these steps to enter the current date and time in order to effectively use the video search function described at the end of this guide.
IMPORTANT! Vous devez suivre ces étapes pour saisir la date et l’heure actuelles afin de pouvoir utiliser la fonction de recherche vidéo décrite à la fin de ce guide.
Video Loss
Configuration initiale