


13
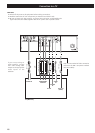
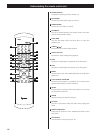
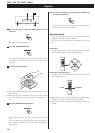
Analog audio output terminals
Use either the XLR or RCA (pin) terminals for analog stereo
output.
XLR: Use balanced XLR audio cable
RCA: Use RCA (pin) audio cable
< When using these terminals, set “Analog Output” to “2 ch”
(or select “2 ch” using the 2CH/MULTI button of the remote
control unit) to downmix the multi-channel material to two
channels.
Note that if “Analog Output” is set to “Multi ch”, only the
front L/R sound of the multi-channel material will be output
from these terminals.
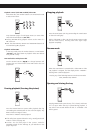
Digital audio output terminals
Digital audio from DVD-Video, CD and video CD is output
from these terminals.
The unit may be connected using either coaxial or optical
(TOS) commercially available cables to amplifiers including a
decoder, or to digital audio devices such as CD recorders,
etc.
COAXIAL: Use RCA (pin) digital audio cable
OPTICAL: Use optical digital audio cable (TOS)
<
The optical terminal is covered by a shutter. Make sure that
the cable is firmly inserted, but do not force the cable when
connecting it or removing it, in order not to cause damage
to the unit.
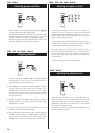
i.LINK (AUDIO) terminal
In addition to the digital audio from DVD-Video, CD and
video CD, the digital surround audio from SACD and DVD-
Audio discs can be output from this terminal.
Use a commercially available S400 compatible i.LINK
(IEEE1394) 6pin cable to connect the unit to an amplifier.
<
When using this terminal, set the i.LINK output setting to
“i.60958” or “i.PCM” (see page 42).
<
See page 43 for further details on i.LINK.
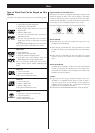
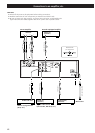
H
G
F
< To enjoy surround sound from a DVD Video disc, connect
the DIGITAL OUT terminal or the i.LINK (AUDIO) terminal to
an amplifier with Dolby Digital/DTS/MPEG decoder.
<
To enjoy surround sound from a DVD Audio and SACD
disc, connect the i.LINK (AUDIO) terminal to a suitably
equipped surround sound amplifier.
<
DVD Audio disc signals are converted where necessary from
192kHz or 176.4kHz to 96kHz/88.2kHz or 48kHz/44.1kHz.
However, there may be some occasions when digital audio
cannot be output by the unit from such a disc.
Word sync connector
This allows the use of an externally-generated word clock
connection, using a commercially available BNC coaxial
cable.
Devices producing such a suitable clock signal include
external D-A converters or dedicated word clock generators.
Connect the SYNC OUT (or WORD OUT) of such a device to
the unit.
SIGNAL GND connection
Use a commercially available PVC-covered cord to connect
the signal ground terminal on the unit to the amplifier signal
ground.
<
Note that this is NOT an electrical safety ground (earth).
Power cord receptacle
After all other connections have been made, insert the
supplied AC power cord into this receptacle, then connect
the other end of the power cord into the wall socket. Ensure
that your AC voltage corresponds to the voltage marked on
the rear panel of the unit. Consult a qualified electrician if
you are in doubt.
<
In order to avoid the risk of electric shock, fire, and so on,
only use the supplied power cord.
<
If you are not going to use the unit for some time,
disconnect the power cord from the wall socket.
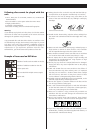
K
J
I