6
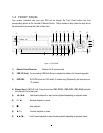
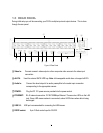
10) View: Press this key to switch between 4x, PiP (Picture In Picture),full screen, 9x, 10x,
13x and 16x.
Note: PIP display is not available in playback mode.
11) SEQ: Press this key to enter the auto sequential switching mode. The sequence dwell
time can be set in “Display Setting” tab of the Menu. For more detail about SEQ,
please see “Section 4.9.2 Display Setting-Main M/T SEQ”.
12) Display: Press this key to switch display of channels and status bar.
13) Monitor: Switch between Main monitor and Call monitor.
14) Zoom: In full screen mode, 2x electronic zoom. Zoom screen can be moved through
arrow keys. Pressing the zoom key again switches the electronic zoom off.
15) Search: Press this key to enter Search Menu. For more detail about the Search function,
please see “Section 3.12 Search”.
16) Menu/ESC: Press this key to enter/exit MAIN SETUP MENU.
17) Copy: Press this key to enter Copy Menu. For more detail about Copy function, please
see “Section 3.13 Copy”.
18) Enter/ Arrow keys: Instead of or in combination with a mouse, you can use these keys to change
the Menu settings.
19) Power LED: This LED ON indicates Power on.
20) HDD LED: This LED ON indicates HDD active.
21) Alarm LED: This LED ON indicates Alarm active.
22) Network LED: This LED ON indicates Network active.
23) Record LED: This LED ON indicates Record active.


