


6 EN
Initial Settings
Video Channel Setting
Video channel setting will be necessary, if your VCR is
connected to the TV via the RF cable.
• Use the remote control for this procedure.
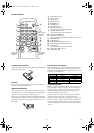
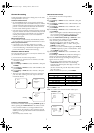
1) Insert a pre-recorded tape into the VCR.
The VCR will turn on and start playback automatically.
If playback does not start, press
PLAY/K.
2) Select and adjust your TV to channel 35.
•If the playback picture appears on the TV screen,
continue with step
8).
•If channel 35 is set for broadcasting, or interference lines
appear on the picture, the RF converter must be set to a
different channel between CH22 and CH69. Continue
with step 3).
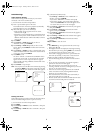
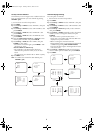
3) Press
MENU.
4) Press
PLAY/K or STOP/L repeatedly to select to
“INITIAL”. Then, press
F.FWD/B.
5) Press
PLAY/K or STOP/L repeatedly to select to “RF
OUT”. Then, press
F.FWD/B. The RF OUT CH menu
will appear.
6) Press PLAY/K or STOP/L to select a channel which is not
used for broadcasted between channel 22 and channel 69
in your area, then press F.FW D/B.
7) Press
MENU to exit.
Set the TV channel to the RF OUT CHANNEL which
was selected on the VCR. A picture from the VCR will
appear on the TV screen. If a picture does not appear,
repeat steps
3) to 7) using a different channel which is not
used for broadcast.
8) Press STOP/L to stop the tape.
Note: You may also access the RF OUT CH menu by pressing
and holding
MENU on the remote control for 3 seconds
during power off
until the RF OUT CH menu appears.
Setting the Clock
This VCR incorporates a 24-hour clock. The clock must be set
for the Timer Recording function to operate correctly.
• Use the remote control for this procedure.
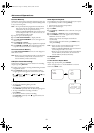
1) Press MENU.
2) Press
PLAY/K or STOP/L to select “INITIAL”, then press
F.FW D/B.
3) Press
PLAY/K or STOP/L to select “CLOCK”, then press
F.FW D/B.
4) (31B-254 and 31B-454 only)
Press
PLAY/K or STOP/L to select “MANUAL” or
“AUTO”, then press
F.FWD/B.
•If you select “MANUAL”, continue with step
5).
•If you select “AUTO”, Auto Clock Setting becomes
“ON”. Press
FUNCTION. The clock will appear on the
TV screen when you turn on the VCR again.
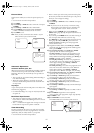
5) Press PLAY/K or STOP/L until the relevant year appears,
then press
F.FWD/B.
6) Press
PLAY/K or STOP/L until the relevant month
appears, then press
F.FWD/B.
7) Press
PLAY/K or STOP/L until the relevant day appears,
then press
F.FWD/B.
8) Press
PLAY/K or STOP/L until the relevant hour appears,
then press
F.FWD/B.
9) Press
PLAY/K or STOP/L until the relevant minute
appears.
10)Press
MENU to start the clock.
Note:
•Press REW/s to go one step back from the current step
during steps
5) to 9).
• Although seconds are not displayed, they begin counting
from 00 when you exit by pressing MENU. Use this feature
to synchronize the clock with the correct time.
• If the VCR is unplugged or if there is a power failure for
more than 30 seconds, you may have to reset the clock.
[AUTO CLOCK] (31B-254 and 31B-454 only)
• Channel Presetting must be set before the Auto Clock is
set.
• To set the clock automatically, the channel assigned to
position 01 must have the PDC signal.
• The clock cannot be set automatically if you are not
receiving a channel that carries a time signal in your area. In
this case, set the clock manually.
• Once the auto clock setting is performed, the VCR will
correct the current time by receiving PDC broadcasts
whenever you turn off the VCR.
• The VCR will correct the current time automatically at
8:00, if the VCR power is turned off.
• Between 23:00~1:00, the AUTO CLOCK function does
not work even if the VCR power is turned off.
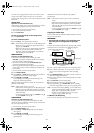
MENU
TIMER
SET UP
INITIAL
RF OUT CH 35
INITIAL
CH TUNING
CLOCK
RF OUT
MENU
TIMER
SET UP
INITIAL
INITIAL
CH TUNING
CLOCK
RF OUT
CLOCK
YEAR 2 0 0 6
MONTH 0 1
DAY 0 4 WE
HOUR
_ _
MINUTE
_ _
HM210BD(EN).fm Page 6 Thursday, March 2, 2006 6:07 PM