The VHF-1001 single channel VHF series wireless system is a high quality audio product
that provides excellent performance under most operating conditions.
Four different models are available and all operate one VHF high band frequency be-
tween 177.60 MHZ to 204.60 MHZ.
THE MODELS AVAILABLE ARE:
VHF-1001M - Which comes equipped with a hand held microphone transmitter.
VHF-1001HL - Which comes equipped with a belt pack transmitter and Headset/ lava-
lier combo.
VHF-1001 SINGLE CHANNEL RECEIVER OPERATION
Note: Effective range between the transmitter and receiver is up to 100 feet.
1. Remove all packing materials. Save the box and packing materials to transport the
unit and in case the unit ever requires service.
2. Plug the AC/DC adaptor into the rear of the receiver. Then plug the
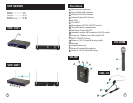
adaptor into an appropriate AC Outlet. Push the Power On (13) button to turn the unit on. The
power indicator will be illuminated.
3. Extend the antenna fully vertical and point it out into the direction you will be speak-
ing from.
4. Insert the 1/4” cable into the jack labeled AF OUT on the rear of the receiver, and
connect the other end of the cable to your amp ,effects or mixer jack.
5. Adjust the volume using the level control on the front panel.
The VHF- 2001 dual channel VHF series wireless system is two separate single channel
transmitters of different frequencies transmitting to one unit that houses both frequency
receivers, each one having its own separate output. There is also individual level control
for each channel.
Two different models are available and both operate on a VHF high band frequency
between 177.60 MHZ to 204.60MHZ
THE MODELS AVAILABLE ARE:
VHF-2001M - Which comes equipped with (2) hand held microphone transmitters.
VHF-2001HL -Which comes equipped with (2) belt pack transmitters and (2) Headset/
lavalier combos.
VHF- 2001 DUAL CHANNEL RECEIVER OPERATION
Note: Effective range between the transmitter and receiver is up to 100 feet.
1. Remove all packing materials. Save the box and packing materials to transport the
unit and in case the unit ever requires service.
2. Plug the AC/DC adaptor into the rear of the receiver. Then plug the adap-
tor into an appropriate AC Outlet. Push the Power On (13) button to turn the
unit on. The power indicator will be illuminated.
3. Extend the antenna fully vertical and point it out into the direction you will be speak-
ing from.
4. Insert the 1/4” cable into the jack labeled AUDIO OUT on the rear of the reciever, and
connect the other end of the cable to your amp ,effects or mixer jack.
5. Adjust the volume using the level control on the front panel.
HAND HELD TRANSMITTER OPERATION
1. Slide the battery holder to open. Insert a 9V battery into the battery holder accord-
ing to the polarity indication marked on the battery housing. Close the battery
holder.
2. Push the power switch to the ON position. The BATT indicator should ash once
briey as you turn on the mic indicating that the mic has sufcient power. If the
BATT stays on, it indicates that the battery has insufcient power and should be
changed. If the BATT does not light at all and the mic does not work, it indicates
the battery is dead and you should change the battery. The microphone can be
muted by setting the switch to the mute position. If the microphone is not going to
be used for any length of time, push the power switch to OFF and remove the bat-
tery. Do not switch the mic on and off rapidly, because you wont get a true indica-
tion from the BATT indicator.
HEADSET/LAVALIER COMBO AND TRANSMITTER OPERATION
1. Open the battery holder turning it counter clockwise. Insert a 9V battery into the bat-
tery holder according to the polarity indication marked on the battery housing. Close
the battery holder.
2. Push the power switch to the ON position. The BATT indicator should ash once
briey as you turn on the mic indicating that the mic has sufcient power. If the BATT
stays on, it indicates that the battery has insufcient power and should be changed.
If the BATT does not light at all and the mic does not work, it indicates the battery
is dead and you should change the battery. If the microphone is not going to be used
for any length of time, push the power switch to OFF and remove the battery. Do not
switch the mic on and off rapidly, because you wont get a true indication from the
BATT indicator.
3. Push the audio mute switch to the ON position.
4. To use headset/lavalier combo as headset MIC, push headset/lavalier MIC switch to
LO. To use headset/lavalier combo as lavalier MIC, push headset/lavalier MIC switch
to HI.
5. The lavalier/ Headset combo wire is the transmit antenna. Do not roll up, coil or
shorten during use. This wire must be kept as straight as possible.
VHF-1001 SINGLE CHANNEL
WIRELESS SYSTEM
6
7
VHF-2001 DUAL CHANNEL
WIRELESS SYSTEM


