GPX10 Customer Support: 1-888-999-4215 GPX 11
Television
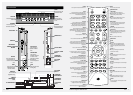
1. Press the SOURCE button to switch to TV mode.
2. Press the CH LIST button, on the remote, to view a list of
available channels.
Unless you are using a Set-Top Box, you must auto scan for
channels before being able to view channels in list view.
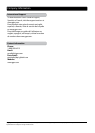
Press the MENU button to access the TV menu.
Press the EXIT button to exit the TV menu.
Picture
Picture Settings
Screen Settings
PC Settings
Color Temperature
Advanced Picture Settings
Sound
Sound Settings
Surround Mode
Analog Sound
Digital Sound
Other Settings
Channel
Channel List
Favorite List
Channel Setting
Signal Type
Auto Channel Search
Parental
Lock Parental Control
V-Chip
Change Password
Front Panel Lock
Source Lock
Setup
Closed Caption
Menu Languag
Clock
Others
Blue Back
No Signal Power O
No Operation Power O
All Reset
Audio Only
1. Press the SOURCE button to switch to TV mode.
2. Press the CHANNEL buttons to select the desired TV channel.
3. Press the ADD/ERASE button to add or erase the current
channel as a favorite.
1. Press the SOURCE button to switch to TV mode.
2. Press the FAV LIST button to view a list of your saved favorites.
1. Press the SOURCE button to switch to TV mode.
2. Press the MENU button.
3. Press the ARROW () buttons, highlight PARENTAL, and
press the ENTER button.
4. The default passcode for the parental lock is:
0 0 0 0
5. Enter the passcode to access the PARENTAL CONTROL
preferences.
6. From this menu, you can lock specic ratings from the
United States rating system or the Canadian rating system by
accessing the V-CHIP settings. You can also lock the buttons on
the television or lock specic sources from access.
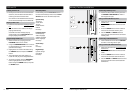
Channel List View
Television Menu
Adding Favorites
Viewing Favorites
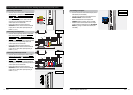
Parental Controls (V-Chip)
Auto Scanning for Channels
The Auto Channel Scan must be run before any channels can be
viewed on the television.
1. Press the SOURCE button to switch to TV mode.
2. Press the MENU button to access the setup menu.
3. Press the ARROW () buttons to highlight the CHANNEL
icon. Press the ENTER button.
4. Press the ARROW () buttons to highlight SIGNAL TYPE.
Press the ARROW () buttons to select AIR.
5. Press the ARROW () buttons to highlight AUTO CHANNEL
SEARCH. Press the ENTER button to begin scanning for
available channels.
1. Press the MENU button to access the setup
menu.
2. Press the ARROW () buttons to
highlight the SETUP icon. Press the ENTER
button.
3. Press the ARROW () buttons to
highlight CLOCK. Press the ENTER button.
4. Press the ARROW () buttons to
highlight TIME ZONE. Press the ARROW
() buttons to select your current time
zone.
5. Press the ARROW () buttons to
highlight AUTO CLOCK. Press the ARROW
() buttons to turn auto clock o and on.
When the correct time zone is set, auto clock
will automatically set your clock and date for
you.
6. To set the time and date manually, turn auto
clock o, highlight SETUP TIME, and use the
ARROW and ENTER buttons to manually set
the time and date.
Setting the Clock