


35
ENGLISH
Wireless network settings
There are two ways of making the wireless net-
work settings.
A Automatic connection,
»Apart from Access Point Selection, all data
regarding the connection settings (»IP Ad-
dress«, »Netmask«, »Gateway« and »DNS«)
are obtained from modem automatically.
B Manual connection,
all connection settings (»IP Address«, »Net-
mask«, »Gateway« and »DNS«) must be
configured manually.
Automatic connection
Most of the home networks are Dynamic. If you
have a dynamic network, you must use a DSL
modem that supports DHCP. Modems and IP
sharers that support DHCP obtain the »DNS«
values that are required for »IP Address«, »Net-
mask«, »Gateway« and internet access auto-
matically, and thus you are not required to enter
those values manually.
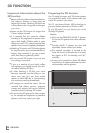
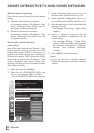
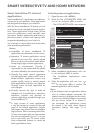
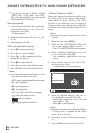
1 Open the menu with »MENU«.
2 Select the line »CONNECTED APPS« with
»
V
« or »
Λ
« and press
»OK«
to confirm.
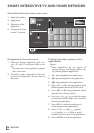
– The »CONNECTED APPS« menu appears.
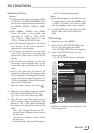
inter@ctive Applications
Connection Type
Wireless
IP Address
DNS
Netmask
Gateway
10.134.151.15
10.134.150.8
255.255.255.0
10.134.151.254
Network Configuration
AUTO
Exit
Back
CONNECTED APPS
Network Settings
dd.mm.yyyy
hh:mm
Connect
Test Connection
OK
Select Access Point
N/A
3 Select »Connection Type« with »
V
« or »
Λ
«
and then select »Wireless« with »
<
« or »
>
«.
SMART INTER@CTIVE TV AND HOME NETWORK
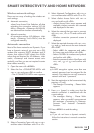
4 Select »Network Configuration« with »
V
« or
»
Λ
« and then select »AUTO« with »
<
« or »
>
«.
5 Select »Select Access Point« with »
V
« or
»
Λ
« and confirm with
»OK«
.
– »Select Access Point« menu appears and
available wireless networks are scanned
and displayed in the menu
6 Select the network that you want to connect
with »
V
«, »
Λ
«, »
<
« or »
>
« and confirm with
»OK«
.
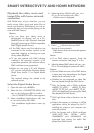
– Wireless connection password screen is
displayed.
7 Select the required character with »
V
«, »
Λ
«,
»
<
« and »
>
« and move to the next character
with
»OK«
.
– Select »ABC« for uppercase and »abc«
for lower case and confirm with
»OK«
.
– Select »?@123« for numbers and symbols
and confirm with
»OK«
.
– Enter the password, select »Confirm« with
»
V
«, »
Λ
«, »
<
« or »
>
« and confirm with
»OK«
.
Note:
7
In WEP encryption system, more than one
network password can be assigned for the
network. Your television can only connect to
network with level 1 password.
8 Start the registration to the home network by
pressing »
« (red).
– The mesage »Connecting ... Please Wait«
appears.
9 Press »
« (green) to make sure that the
network connection is established with the
current settings.
– The messages »Testing ... Please Wait«
appears, after successfull announcement
the messages »Connecting To Gateway:
Success« and »Internet Connection:
Success«.
10 Press »MENU« to end the setting.
Note:
7
If you do not have a dynamic network,
follow the instructions in manual connection
section.