


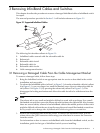


cable management bracket, go around the bottom cable, and then back up through the first
slot in the cable management bracket.
3. Put the releasable cable tie end through the buckle and secure the two InfiniBand cables
firmly.
Caution:
Only hand-tighten the releasable cable tie to prevent damage to the InfiniBand cables.
4. Leave approximately 3/8 inch to 1/2 inch coming out of the releasable cable tie buckle and
clip the excess. Use one of the clipped-off pieces of cable tie as a tightness gauge to ensure
that the InfiniBand cable moves freely, but is securely fastened in the releasable cable tie
loop.
5. Repeat steps 1 through 4 to install and secure the remaining InfiniBand cables to the cable
management bracket. Be sure to use the appropriate slots for each releasable cable tie.
6. Route the InfiniBand cables to the side of the rack and secure them either upward or
downward in the cable management plate. Be sure not to exceed the 4-inch minimum bend
radius for each InfiniBand cable as you route them in the rack.
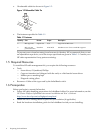
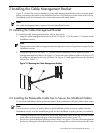
Figure 2-2 Installing the Releasable Cable Ties
1
2
3
4
The following list describes the callouts shown in Figure 2-2:
1. Left rear rack column
2. Cable management bracket
3. Two InfiniBand cables secured with one releasable cable tie
4. InfiniBand switch
Caution:
The releasable cable tie should only be tightened by hand. Do not use a cable tie installation tool
and do not over tighten the releasable cable tie or it might damage the InfiniBand cable.
8 Installing the Cable Management Bracket