


–
9
–
EN
HOOK UPS
NOTES:
• Connect the DVD player directly to a TV. If the A/V cables are connected to a VCR, pictures may be distorted due to the
copy protection system.
• Be sure to turn off all components in the system before connecting another component.
• Refer to the owner's manuals for your TV, stereo system and any other components to be connected to the DVD player.
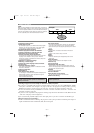
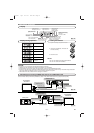
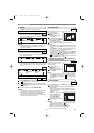
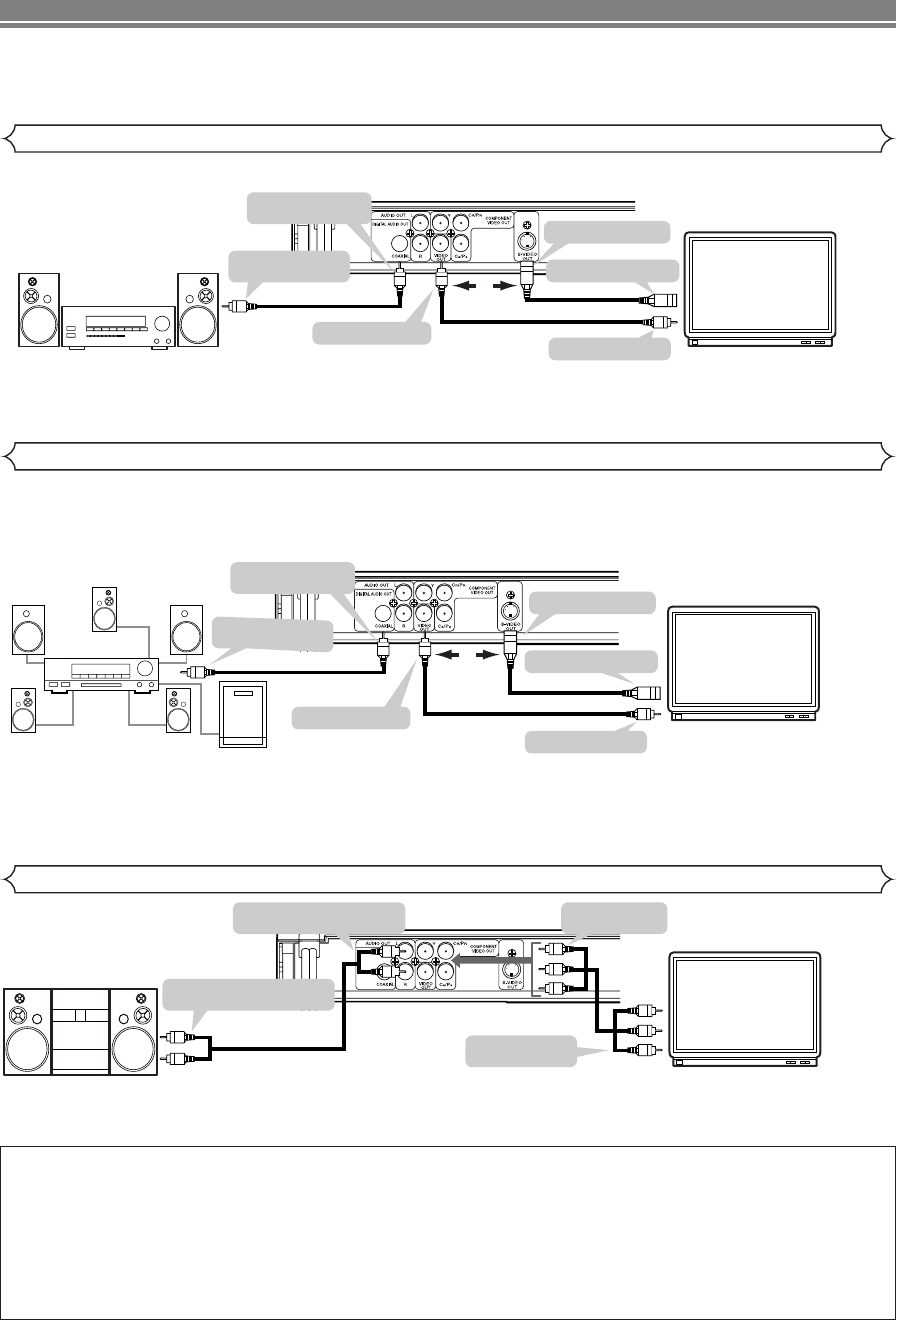
Connecting to an Amplifier Equipped with Digital Input Jacks such as MD deck or DAT deck
Use an audio coaxial digital cable (commercially available) for the audio connections. Connecting to an amplifier equipped
with a coaxial digital input jack such as MD Deck or Dat Deck.
A/V-compatible or
wide screen TV
Amplifier equipped with digital
input jacks, MD deck,
DAT deck, etc.
or
To VIDEO INPUT jack
To S-VIDEO OUT jack
To S-VIDEO INPUT jack
To COAXIAL DIGITAL
AUDIO INPUT jack
To COAXIAL DIGITAL
AUDIO OUT jack
To VIDEO OUT jack
[Fig. 7]
NOTES:
•
The audio source on a disc in a Dolby Digital 5.1 channel surround format cannot be recorded as digital sound by an MD or DAT deck.
•
Set “DOLBY DIGITAL” to “PCM” and “DTS” to “OFF” for audio output in the setup mode. Playing a DVD using incorrect settings
may generate noise distortion, and may also damage the speakers.(See page 14 to change the audio settings.
)
HOW TO CONNECT TO A TV WITHOUT AUDIO/VIDEO INPUT JACKS
If your TV does not have RCA type audio and video input jacks it is still possible to connect this DVD player to your TV’s 75-ohm coaxi-
al antenna terminal using a commercially available Stereo Audio/Video RF Modulator. Connect the audio and video outputs of the DVD
player to the audio and video inputs on the RF Modulator, and then connect the coaxial output of the RF Modulator (usually marked
“TO TV”) to the 75 ohm coaxial antenna terminal on your TV. Follow the instruction supplied with the RF Modulator for more details.
If your TV’s 75 ohm coaxial antenna terminal is already occupied by an antenna or cable box connection, remove that cable from your
TV’s antenna terminal and reconnect it to the coaxial antenna input terminal of the RF Modulator (usually marked “ANT IN”), then con-
nect the RF modulator to your TV’s antenna terminal.
NOTE:
•
The picture quality from DVDs will not be as good if the DVD player is connected to the TV’s antenna terminal through an RF Modulator.
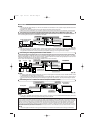
Connecting to a TV or a Stereo TV that has Component VIDEO In Jacks
A/V-compatible or
wide screen TV
To Right (red) and Left (white)
AUDIO OUT jacks
To Right (red) and Left (white)
ANALOG AUDIO INPUT jacks
Stereo system
To COMPONENT
VIDEO INPUT jack
To COMPONENT
VIDEO OUT jack
[Fig. 9]
NOTES:
•
IF output is Dolby Digital- or DTS-encoded audio, connect to a Dolby Digital or DTS decorder, and set “DOLBY DIGITAL” or DTS
to “BITSTREAM” for audio output in the setup mode.
• Unless connected to a Dolby Digital or DTS decoder, set “DOLBY DIGITAL” to “PCM” or “DTS” to “OFF” for audio output in
the setup mode. Playing a DVD using incorrect settings may generate noise distortion, and may also damage the speak-
ers.
NOTE:
• If your TV is compatible with progressive scanning (480p), connect the TV to the COMPONENT VIDEO OUT jacks of the
DVD player, and make sure the progressive scanning mode is selected.
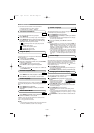
Connecting to a Dolby Digital decoder or DTS decoder
If using this DVD player to playback a DVD in a 5.1 channel Dolby Digital surround or DTS surround format, the DVD player
outputs a Dolby Digital or DTS data stream from its COAXIAL DIGITAL AUDIO OUT jack. By hooking the player up to a Dolby
Digital or DTS decoder, you can enjoy a more convincing, realistic ambience with powerful and high-quality surround sound of
a professional standard such as can be heard in movie theaters.
Use an audio coaxial digital cable (commercially available) for the audio connections.
A/V-compatible or
wide screen TV
Front
speaker
(left)
Center speaker
Front
speaker
(right)
Surround
speaker
(left)
Surround
speaker
(right)
Subwoofer
Dolby Digital
decoder
or
To VIDEO INPUT jack
To S-VIDEO OUT jack
To S-VIDEO INPUT jack
To COAXIAL DIGITAL
AUDIO INPUT jack
To COAXIAL DIGITAL
AUDIO OUT jack
To VIDEO OUT jack
[Fig. 8]
E5911UD.qx4 04.1.27 0:05 PM Page 9