


—20—
Page 20 January 25, 2002 9:33 am
C
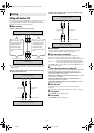
Select video input connector
Select the appropriate mode depending on the connector being
used (
੬
pg. 16).
When using S-VIDEO input connector on the front panel, set
“FRONT AUX INPUT” to “S-VIDEO”.
When using S-VIDEO IN connector on the rear panel, set “REAR
AUX INPUT” to “S-VIDEO”.
When using VIDEO input connector on the front panel, set
“FRONT AUX INPUT” to “VIDEO”.
When using VIDEO IN connector on the rear panel, set “REAR
AUX INPUT” to “VIDEO”.
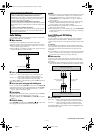
D
Select edit mode
Set the edit mode to “ON” for the VCRs if such a mode is
equipped.
●
On this VCR, set “PICTURE CONTROL” to “EDIT” (
੬
pg. 15).
E
Locate end point
Load the cassette to be edited into the VCR and press PLAY (4),
then press PAUSE (9) when you find the end of the scene for
which you want to edit.
Press C.RESET so that the counter reading becomes “0:00:00”.
F
Locate start point, and engage Insert Editing mode
Press REW (
3
), then press PAUSE (9) when you find the
beginning of the scene for which you want to edit, then press
INSERT.
●
The VCR enters the Insert Editing Pause mode. “
⅜
” and “$”
light on the display panel.
●
If you want to perform AV Dubbing and replace the picture,
Hi-Fi audio soundtrack and normal audio soundtrack all at the
same time, after you press INSERT, press A.DUB also.
G
Start editing
Load the source cassette and engage the Play mode of the other
component, then press PLAY (4) on the VCR. Insert Editing begins
at this point.
●
Insert Editing stops automatically when the counter reaches
“0:00:00”, and the VCR enters the Play mode.
To stop editing any time during recording
Press STOP (8) on the Remote or STOP/EJECT (0) on the
VCR, then engage the Stop mode of the other component.
NOTES:
●
Insert Editing is not possible with a cassette whose record safety
tab has been removed.
●
The recording speed (SP/EP) is determined by the previous
recording to be replaced. If the recording speed changes on the
tape to be edited while editing the tape, the inserted picture will
be distorted where the recording speed changes.
●
When you edit a tape, a small portion of the recording
preceding to the editing start point will be erased from the
edited tape.
Specifications shown are for SP mode unless specified otherwise.
E. & O.E. Design and specifications subject to change without
notice.
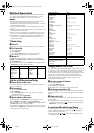
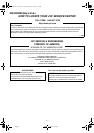
Specifications
GENERAL
Power requirement : AC 120 V
d
, 60 Hz
Power consumption
Power on : 17 W
Power off : 1.5 W
Temp era tu re
Operating : 5°C to 40°C (41°F to 104°F)
Storage : –20°C to 60°C (–4°F to140°F)
Operating position : Horizontal only
Dimensions (W x H x D) : 435 mm x 94 mm x 247 mm
(17-3/16" x 3-3/4" x 9-3/4")
Weight : 2.8 kg (6.2 lbs)
Format : S-VHS/VHS NTSC standard
Maximum recording time
SP : 210 min. with ST-210 video cassette
EP : 630 min. with ST-210 video cassette
VIDEO/AUDIO
Signal system : NTSC-type color signal and EIA
monochrome signal, 525 lines/
60 fields
Recording/Playback
system
: DA-4 (Double Azimuth) head helical
scan system
Signal-to-noise ratio : 45 dB
Horizontal resolution
VHS : 230 lines
S-VHS : 400 lines
Frequency range
Normal audio : 70 Hz to 10,000 Hz
Hi-Fi audio : 20 Hz to 20,000 Hz
Input/Output : RCA connectors (IN x 2, OUT x 1)
S-video connectors (IN x 2, OUT x 1)
TUNER
Tuning system : Frequency-synthesized tuner
Channel coverage
VHF : Channels 2–13
UHF : Channels 14–69
CATV : 113 Channels
RF output : Channel 3 or 4 (switchable; preset to
Channel 3 when shipped) 75 ohms,
unbalanced
TIMER
Clock reference : Quartz
Program capacity : 1-year programmable timer/
8 programs
Memory backup for timer is not supported.
ACCESSORIES
Provided accessories : Infrared remote control unit,
“AA” battery x 2,
S-video cable (4-pin),
RF cable (F-type)
HR-S5901U-EN.fm Page 20 Friday, January 25, 2002 9:33 AM