


Masterpage:Right
EN
9
Filename [HRJ880EU1.fm]
Page 9 May 18, 2001 10:59 am
INSTALLING YOUR NEW RECORDER
Basic Connections
It’s essential that your video recorder be properly
connected.
A
Check the contents.
Make sure the package contains all of the accessories
listed in “SPECIFICATIONS” on page 78.
B
Situate the recorder.
Place the recorder on a stable, horizontal surface.
C
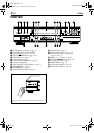
Connect the recorder to TV.
The connection method you use depends on the type of
TV you have.
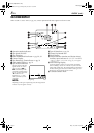
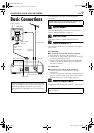
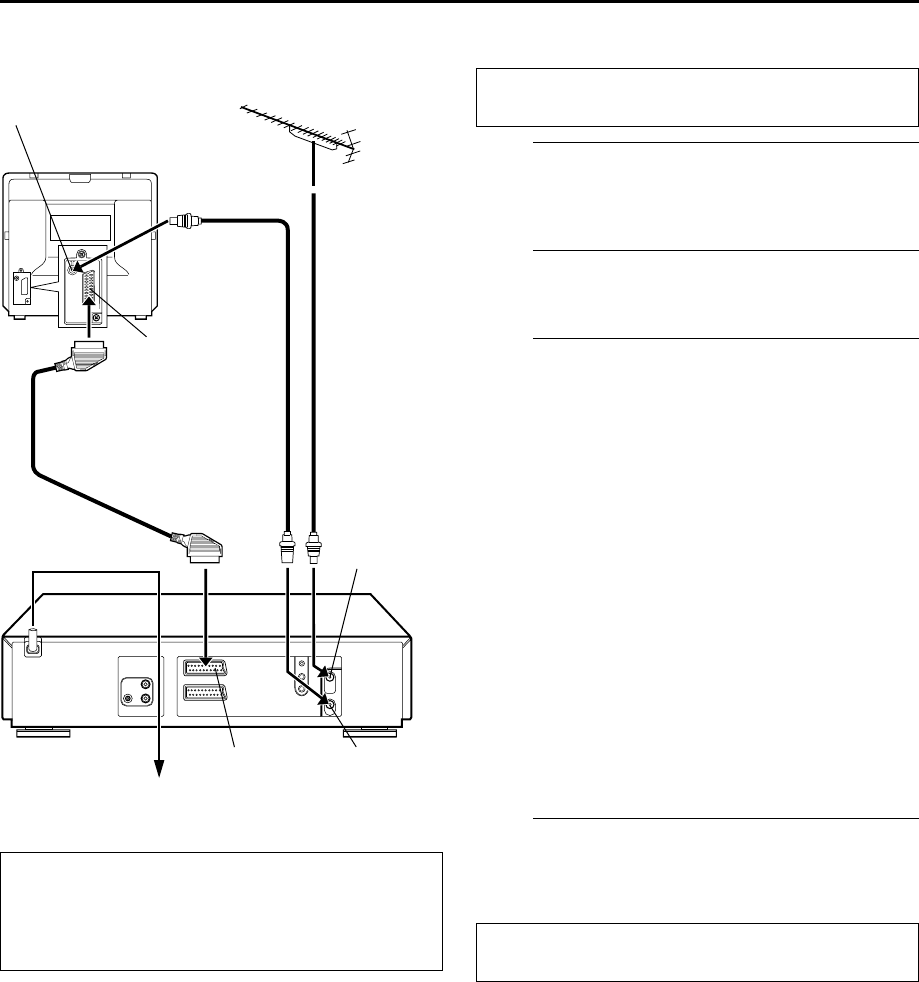
RF Connection
8
To connect to a TV with NO AV input connectors . . .
A
Disconnect the TV aerial cable from the TV.
B
Connect the TV aerial cable to the ANT. IN connector
on the rear panel of the recorder.
C
Connect the provided RF cable between the RF OUT
connector on the rear panel of the recorder and the
TV’s aerial connector.
AV Connection
8
To connect to a TV with AV input connectors . . .
A
Connect the aerial, recorder and TV as per “RF
Connection”.
B
Connect an optional 21-pin SCART cable between the
AV1 (L-1) IN/OUT connector on the rear panel of the
recorder and the TV’s 21-pin SCART connector.
D
Connect the recorder to mains.
Plug the end of the mains power cord into a mains outlet.
Make AV connection if your TV has a 21-pin AV input
connector (SCART) in order to reduce the possibility of
interference. With AV connection, you can enjoy
stereo playback of video tapes if you are using a stereo
TV.
Aerial connector
Back of TV
21-pin SCART
connector
TV aerial cable
RF cable
(provided)
21-pin SCART
cable
(not provided)
Mains power cord
Mains outlet
Back of recorder
AV1 (L-1) IN/OUT
ANT. IN
RF OUT
THESE STEPS MUST BE COMPLETED BEFORE ANY
VIDEO OPERATION CAN BE PERFORMED.
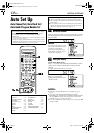
After the connection is completed, perform “Auto Set
Up” on page 10.
HRJ880EU1.fm Page 9 Friday, May 18, 2001 11:03 AM