


Page 15 March 26, 2001 12:32 pm
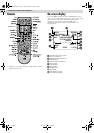
Changing Remote Control Code
This Remote is capable of transmitting two control codes; one set
to respond to A code control signals and another set to respond to
B code control signals. This Remote control is preset to send A
code signals because your VCR is initially set to respond to A
code signals. You can easily modify your VCR and the Remote to
respond to B code signals. When using two JVC VCRs, set two
VCRs and their Remotes to different codes, so that you can
operate these VCRs separately.
A
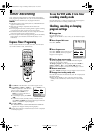
Set remote control code for Remote
A Press and hold VCR.
B Press the Number key “2”.
C Press OK, and release VCR.
● The Remote now can transmit B code control signals.
B
Check remote control code for VCR
Press and hold 4 on the VCR for more than 5 seconds while the
VCR is turned off. The code currently set appears on the display
panel.
C
Change code for VCR
Press any key on the Remote. The VCR now responds to B code
control signals.
● To set the Remote and the VCR back to A code control signals,
repeat the same procedure as shown above except pressing the
Number key “1” in step B of
1
11
1
.
To control two VCRs with the same Remote
You can control two JVC VCRs by switching the remote control
code for the Remote between A and B (
੬
step
A
AA
A
), keeping two
VCRs to different control codes.
● To change only the remote control code for the Remote, DO
NOT perform steps
B
BB
B
and
C
CC
C
.
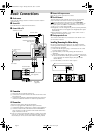
Editing
You can use your VCR as the playback or recording VCR. You can
use a camcorder as the playback VCR and your VCR as the
recording VCR. Refer also to the other components’ instruction
manuals for connection and its operations.
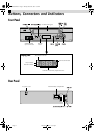
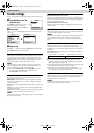
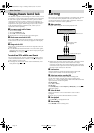
A
Make connections
Example: When using this VCR as the playback VCR
● When using this VCR as the recording VCR, connect this VCR’s
audio/video input connectors to the audio/video output
connectors on the other VCR. If the playback VCR is monaural,
connect the audio output connector on the playback VCR to the
left audio input connector on this VCR.
B
Load cassettes
Insert the playback cassette into the playback VCR and the
cassette to be recorded on into the recording VCR.
C
Select input mode on recording VCR
Select the correct external input on the recording VCR.
On this VCR (when using this VCR as the recording VCR);
Select “F-1” — when connecting the other VCR to the audio/video
input connectors on the front panel.
On the Remote
Press AUX or CH+/–.
On the VCR
Press PAUSE[CH], and then FF[CH+] or REW[CH–]. See step
B
BB
B
in
“Basic Recording”.
D
Select edit mode
Set the edit mode to “ON” for the VCRs if such a mode is
equipped.
● On this VCR, set “PICTURE CONTROL” to “EDIT”.
E
Start playback
Press PLAY (
4
) on the playback VCR.
F
Start recording
Press REC (
7
) on the recording VCR.
To audio/video input
This VCR (for playback)
Another VCR (for recording)
Audio/video cable
(not supplied)
To AUDIO/VIDEO OUT
– Other Functions –
HR-J6008UM-EN.fm Page 15 Monday, March 26, 2001 12:32 PM