Page 5 March 26, 2001 12:32 pm
Basic Connections
A
Check contents
Make sure the package contains all of the accessories listed in
“Specifications”.
B
Situate VCR
Place the VCR on a stable, horizontal surface.
C
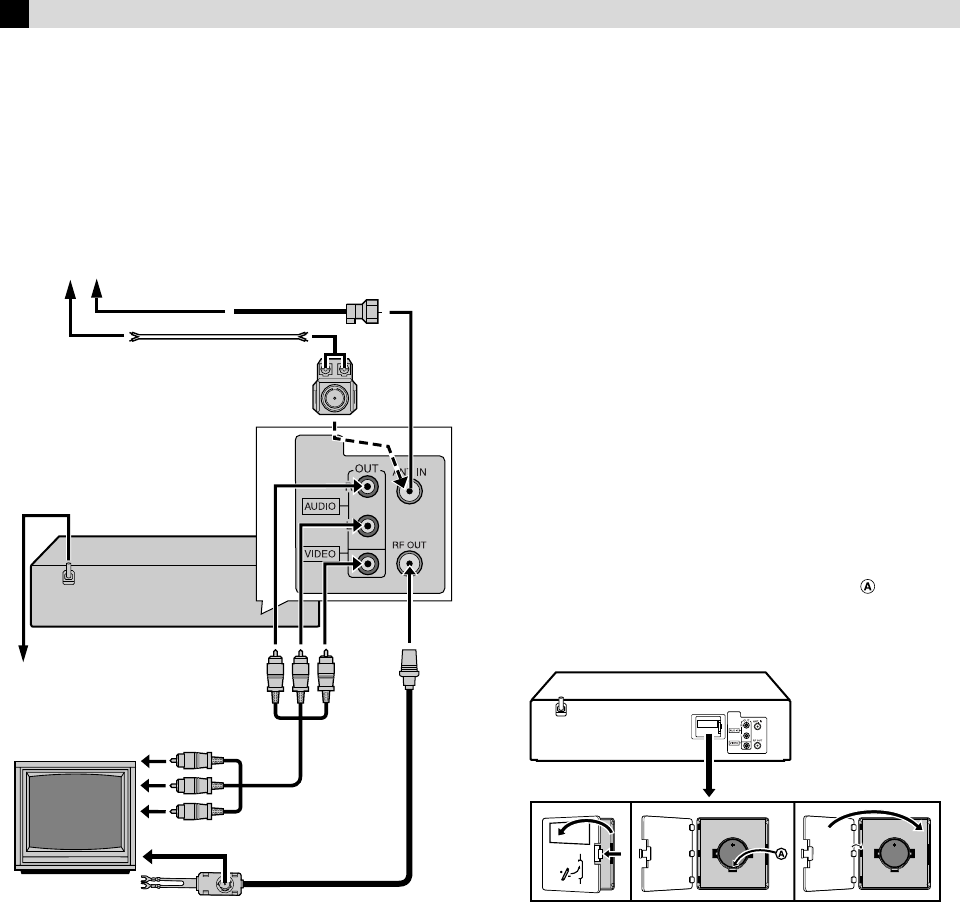
Connect VCR to TV
RF Connection
A Disconnect the TV antenna from the TV.
B Connect the TV antenna cable to the ANT. IN terminal on the
rear of the VCR.
C Connect the supplied RF cable between the RF OUT terminal
on the rear of the VCR and the TV’s antenna input terminal.
AV Connection
(improves picture quality during tape playback.)
If your TV is equipped with audio/video input connectors
A Connect the antenna, VCR and TV as shown in the illustration.
B Connect an audio/video cable between the AUDIO/VIDEO
OUT connectors on the rear of the VCR and the audio/video
input connectors on the TV.
● Even if you are using audio/video cables to connect your VCR to
your TV, you must also connect it using the RF cable. This will
ensure that you can record one show while watching another.
D
Connect VCR to power source
Plug the AC power cord into an AC outlet.
E
Set VCR channel
The VCR channel is the channel on which you can watch the
picture from the VCR on the TV when only using the RF
connection. When the VCR is turned off, press STOP/EJECT
(
0
) on the VCR for more than 5 seconds. “CH3” appears on
the display panel. Press PR+/– on the Remote to select “CH3”,
“CH4” or “CH–”(OFF), then press OK.
● If Plug&Play or Tuner setting has not previously been performed,
the Language Select screen appears and Plug&Play takes place
automatically.
● The VCR channel is preset to “CH3”. Set to “CH4” if CH3 is
used for broadcasting in your area.
F
Final preparation for use
Turn on the VCR and the TV, and select the VCR channel 3 or 4
(or AV mode) on the TV.
Installing/Removing the lithium battery
Be sure to connect the power plug to an AC outlet first before
installing the lithium battery; otherwise, the battery’s service life
will be drastically shortened.
A Make sure that the power plug is connected to an AC outlet
and turn off the VCR power.
B Open the battery cover while pressing the release tab as
illustrated.
C Insert a lithium battery with the plus (+) side up and push it in.
● To remove the lithium battery, press the latch downward
using a pointed non-metallic object, then pull out the
lithium battery.
D Close the battery cover until it clicks in place.
RF cable
(supplied)
Back of VCR
Flat feeder
AC power cord
Audio/video cable
(not supplied)
To audio/video
input connectors
Antenna or cable
Matching transformer
(not supplied)
Coaxial cable
AC outlet
To 75 ⍀ terminal
TV
To 300 ⍀ terminal
HR-J6008UM-EN.fm Page 5 Monday, March 26, 2001 12:32 PM


