936.2681/C/0906/2.6def
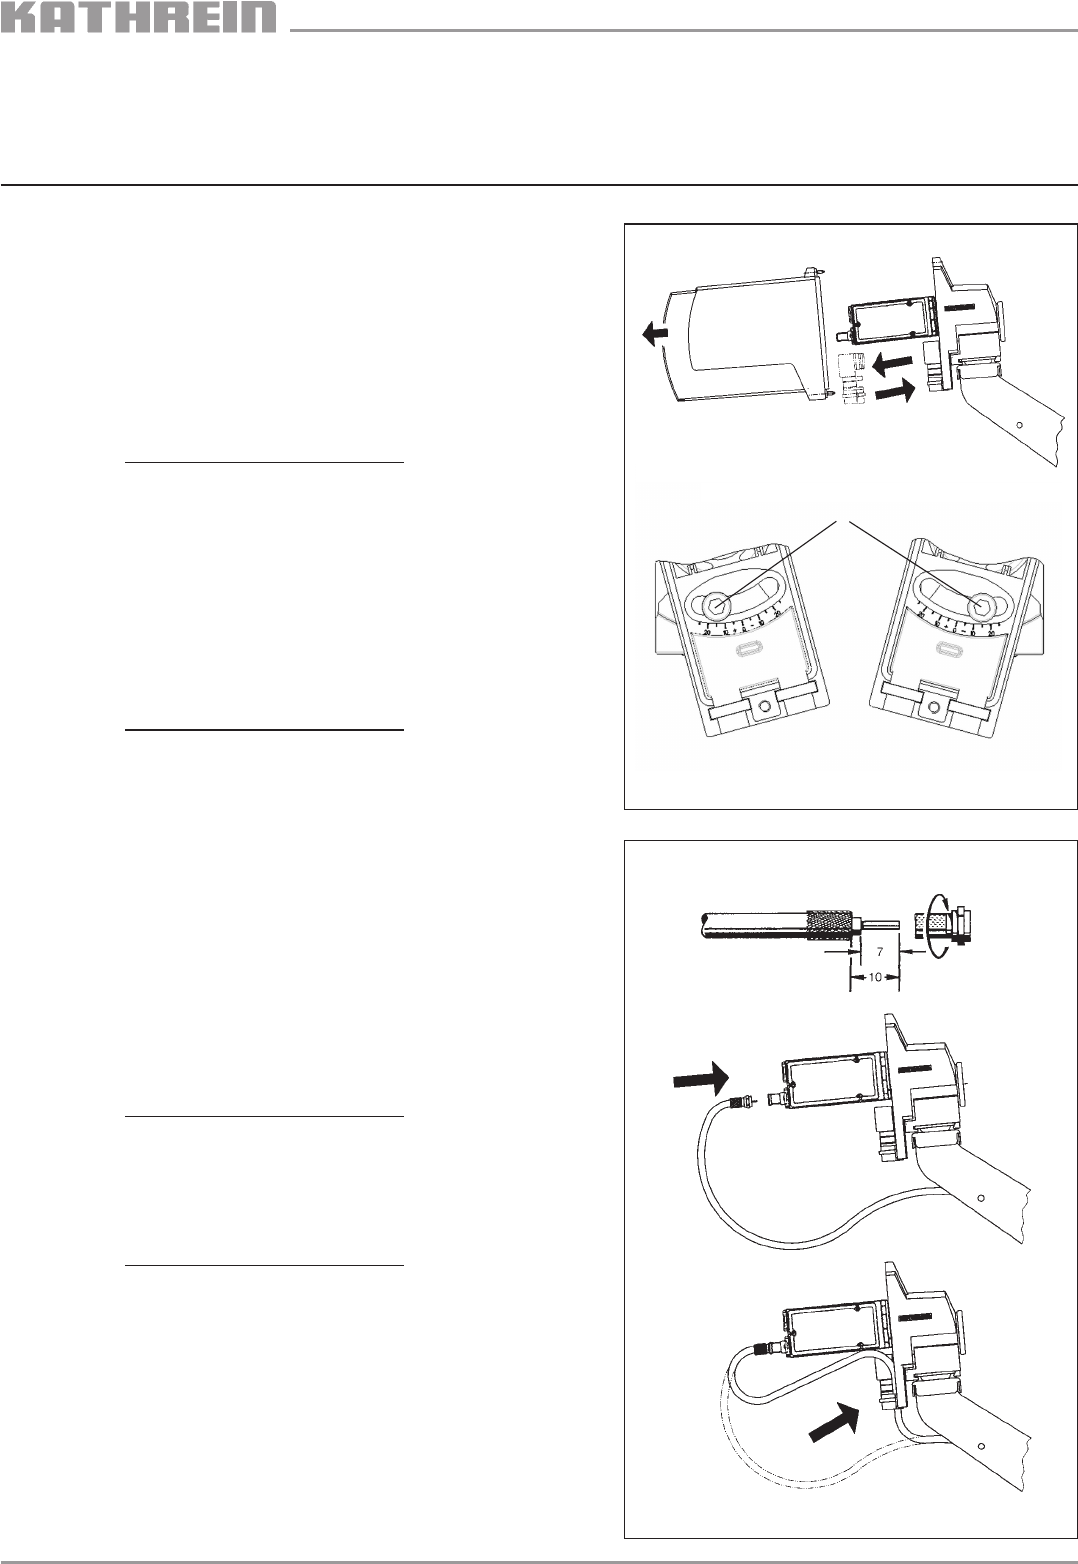
Polarisations-Voreinstellung (Abb. 2)
1. Haube abmontieren.
2. Wert für die Polarisationsv-Voreinstellung aus Tabelle Seite 6
entnehmen. Bei abweichendem Wert von den voreingestellten
0° ist wie folgt zu verfahren:
3. Kombiteil-Dichtelement und Kabelhalter herausziehen.
4. Innensechskantschraube S
k lockern und durch Drehen des
Speisesystems den Wert lt. Polarisations-Voreinstellungs-
Tabelle einstellen. Anziehdrehmoment: max. 6 Nm.
5. Kombiteil-Dichtelement und Kabelhalter bis auf Anschlag
eindrücken.
Setting the polarisation (Fig. 2)
1. Remove the cover from the feed system.
2. Refer to the table on page 6 to learn the value for the polarisation-
presetting. If the value differs from the preset 0°, proceed as
follows:
3. Pull out the sealing element and also the cable support.
4. Loosen the hex socket head screw S
k and set the value according
to the enclosed table by turning the feed system.
Torque max. 6 Nm.
5. Push in the sealing element and the cable support as far as it will
go.
Ajustage de la polarisation
(Fig. 2)
1. Enlever le capot de la tête SHF.
2. Relever la valeur d’ajustage de polarisation du tableau livré avec la
tête (voir page 6). Au cas où la valeur est différente de la valeur
préajustée de 0°, procéder comme suit:
3. Tirer l’élément d’etanchéité ainsi que le support de câbles hors de
la partie-combi.
4. Desserrer l’écrou à six pans S
k, ajuster la valeur indiquée dans la
tableau en tourant la tête SHF.
5. Repousser jusqu’à l’arrêt l’élément d’étanchéité ainsi que le support
de câble
Kabelanschluss (Abb. 3)
1. Beiliegenden F-Stecker auf Kathrein-Kabeltyp LCD 95,
LCD 99 oder LCD 111 montieren und am LNB anschließen.
2. Angeschlossenes Kabel in den Kabelhalter eindrücken.
Cable connection (Fig. 3)
1. Connect the enclosed F connectors to the Kathrein cables
LCD 95, LCD 99 or LCD 111.
Then connect it to the LNB as shown on the sticker.
2. Push the connected cable into the cable support.
Raccordement (Illustr. 3)
1. Raccorder le connecteur F avec les câbles Kathrein types
LCD 95, LCD 99 ou LCD 111 comme demontré et raccorder les
mêmes avec le LNB.
2. Ensuite fixer le câble dans le support de câble.
O
S
+ 15° - 15°
Geflecht zurückgelegt
Braiding overturned
Tressage retroussé
Abb. / Fig. / Illustr. 2
Abb. / Fig. / Fig. 3


