


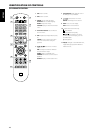


You may operate the T 557 from its front panel or via the BR 2 remote
control. Since the remote control will be the primary controller for most
cases, we will focus on remote-controlled operations. Be sure also to read
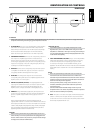
the section, “IDENTIFICATION OF CONTROLS - FRONT PANEL”.
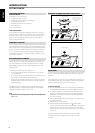
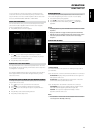
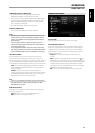
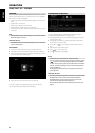
USING THE HOME MENU
From the Home Menu screen, you can access the Setup menu as well as
select desired media for playback. If the Home Menu does not appear,
check your applicable video connections.
1 Press [HOME] and the Home Menu appears.
2 Use [ ] keys to select among the following menu options -
Movie, Photo, Music or Setup. If there is no disc loaded, only “Setup” is
accessible from these Home Menu options.
3 Press [ENTER] to select menu option.
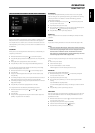
DISPLAY THE T 557 SETUP MENU
The Setup Menu allows one to customize the operation of the T 557. If the
factory defaults do not suit your taste, you will need to use the setup menu
to congure the T 557 yourself.
Press the BR 2’s [HOME] button and then select “Setup” for the Setup Menu
OSD to appear. With the use of the BR 2’s navigation buttons, you may
select various menus.
NAVIGATING THE SETUP MENU OSD AND MAKING CHANGES
To navigate through the Setup Menu OSD options, please do the following
using the BR 2 remote control:
1 Use [ ] keys to move up or down the menu selections.
2 Press [ ] to move backward or forward a menu window.
3 Use [ ] keys to select through the options of a particular menu
item.
4 Press [ENTER] to select a desired setting/selection.
5 Press [RTN] to exit the Setup menu.
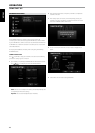
DISPLAY DISC OSD
You can display the general disc playback status on the TV screen. Some
items can be changed using the menu. To use the on-screen display
1 Press the BR 2’s [DISP] during playback.
2 Press [ ] to select an item. The selected item is highlighted.
3 Key-in the desired the number button, press [ ] or [ENTER] as
applicable.
NOTES
• The display feature may not be available for all disc media and is media
dependent.
• Display disc OSD does not apply to audio only discs like CD and MP3/
WMA les as they are already presented in their respective menu screens.
• If no button is pressed for about 15 seconds, the on-screen display
disappears.
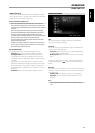
DISPLAY SETUP MENU
TV ASPECT RATIO
Set TV ASPECT RATIO to select a picture size matching the aspect ratio of
your TV/Monitor.
Select “4:3 Letter Box” or “4:3 Pan Scan” when a standard 4:3 TV is connected.
4:3 Letter Box: Displays a wide picture with bands on the upper and
lower portions of the screen.
4:3 Pan Scan: Automatically displays the wide picture on the entire
screen and cuts o the portions that do not t.
Select “16:9 Original” or “16:9 Full” when a 16:9 wide TV is connected.
16:9 Original: The 4:3 picture is displayed with an original 4:3 aspect
ration, with black bars appearing at the left and right sides.
16:9 Full: The 4:3 pictures is adjusted horizontally (in a linear
proportion) to ll the entire screen.
NOTE
“4:3 Letter Box” or “4:3 Pan Scan” are not selectable when the resolution
is set to higher than 480i/480p (576i/576p).
OPERATION
USING THE T 557
11
ENGLISHFRANÇAISESPAÑOLITALIANODEUTSCHNEDERLANDSSVENSKAРУССКИЙ