


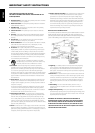
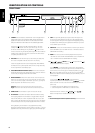
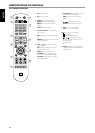
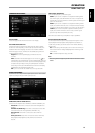

IDENTIFICATION OF CONTROLS
REAR PANEL
1 AC MAINS INPUT: The T 587 comes supplied with a separate AC Mains
cable. Before connecting the cable to a live wall socket, ensure rst
that it is rmly connected to the T 587’s AC Mains input socket. Always
disconnect the AC Mains cable plug from the live wall socket rst,
before disconnecting the cable from the T 587’s Mains input socket.
2 COMPONENT VIDEO OUT: Connect to the corresponding component
video input of a compatible equipment like a monitor/television,
projector, A/V receiver or processor. Be sure to observe consistency in
connecting the appropriate Y, Cb/Pb, Cr/Pr jacks to the corresponding
sources/inputs. Do not rely purely on the color coding of the jacks,
which may not always be consistent among brands.
3 VIDEO OUT: Connect to the corresponding composite video input of
a compatible monitor/television, projector, A/V receiver or processor
using quality dual-RCA cable designed for video signals.
4 AUDIO OUT: This analog audio output can be connected to the
corresponding analog audio input of a compatible equipment like an
amplier, receiver, TV or stereo system.
5 DIGITAL OUT (COAXIAL, OPTICAL): The digital playback audio
output signal is available at these ports. Connect the optical or coaxial
digital OUT ports to the corresponding S/PDIF digital input of an
amplier, receiver, computer soundcard or other digital processors.
6 HDMI OUT: Using a HDMI cable (supplied only for 230V version model),
connect the HDMI OUT jack to the corresponding HDMI input jack of a
compatible equipment like a HDTV, a projector or an A/V Receiver.
Dolby TrueHD, Dolby Digital Plus and DTS-HD Master Audio are
supported with maximum 7.1 channels when HDMI OUT is the selected
audio output port. Make sure to connect to an amplier or receiver with
a built-in (Dolby Digital, Dolby Digital Plus, Dolby TrueHD, Dolby Digital
Plus, DTS-HD Master Audio and other applicable formats) decoder to
playback applicable multichannel audio formats.
WARNING
Before connecting and disconnecting any HDMI cables, both the T 587
and the ancillary source must be powered OFF and unplugged from the
AC outlet. Failure to observe this practice may cause permanent damage
to all equipment connected via HDMI sockets.
IMPORTANT NOTICE
If your HDMI equipped TV is not capable of decoding DTS or Dolby
Digital Bitstream, set the T 587’s HDMI or SPDIF setting at the “Audio
Setup Menu” to “PCM Stereo”. There may be a rushing noise heard if your
TV is not capable of decoding the DTS (or Dolby Digital) Bitstream; most
TVs do not have this capability.
7 LOCAL AREA NETWORK (LAN) PORT: Using a commercially available
straight LAN cable (Category 5/CAT5 or better with RJ45 connector),
connect this LAN port to the corresponding port of your modem
or router. By connecting the T 587 to broadband internet, you can
playback a disc that oers BD-Live function. Refer also to the “NETWORK
SETUP MENU” section of “USING THE T 587” under the “OPERATION” main
heading.
NOTES
• NAD is not responsible for any malfunction of the T 587 and/or the
internet connection due to communication errors or malfunctions
associated with your broadband internet connection or other connected
equipment. Contact your Internet Service Provider (ISP) for assistance or
the service bureau of your other equipment.
• Contact your ISP for policies, charges, content restrictions, service
limitations, bandwidth, repair and other related issues pertinent to
internet connectivity.
• Some disc related material available through internet may not be
compatible with the T 587. Contact the producer of the disc for questions
about such content availability or compatibility.
8 IR IN: This input is connected to the output of an IR (infrared) repeater
(Xantech or similar) or the IR output of another component to allow
control of the T 587 from a remote location. Most NAD products with IR
OUT are fully compatible with the T 587.
3 4 5 81 2
ATTENTION!
Please make sure that the T 587 is powered o or unplugged before making any connections. It is also advisable to power down or unplug all associated
components while making or breaking any signal or AC power connections.
6 7
9
ENGLISHFRANÇAISESPAÑOLITALIANODEUTSCHNEDERLANDSSVENSKAРУССКИЙ