


WWW.ONEFORALL.COM 19
Your ONE FOR ALL 5 Remote Control is compatible with ONE FOR ALL Light
C
ontrol accessories, allowing you to control one or more of the lights in your
h
ouse using the remote. To begin, you will need to purchase the ONE FOR ALL
Light Control Starters Kit (HC-8300). The next step is to set up a code on a spare
device key, which will allow you to control up to 10 Light Control Receivers. The
code should be set up on a key which is configured to accept a AMP code. If you
a
re already using the AMP key, you will need to change a spare device key to
accept a AMP code. To do this, follow the Mode Re-Assignment feature on page
12.
T
o set-up a code, simply follow the normal procedure on page 6. The following
codes can be set up for Light Control:
OFA Light Control – 1000, 1001, 1002, 1003, 1004, 1005, 1006, 1007, 1008,
1
009, 1010, 1011, 1012, 1013, 1014, 1015
I
t is recommended to use the first code listed. As the Light Control system works
with Radio Frequency there is the possibility of interference. If your Light
Control kit is not responding well, try one of the other codes listed.
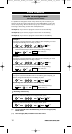
Set up the HC Receiver
To set up your HC Receiver to work with your remote, you will need to
assign a number to it. This is a one-time process that will allow you to
control individual lights separately if you purchase additional HC Receivers
in the future. To assign a number to the plug, follow these steps:
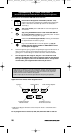
• Plug the lamp into the HC Receiver, and plug the HC Receiver into the
wall outlet. If your lamp has a power switch it should be in the “ON”
position.
• Plug the Command Centre in as close as possible to the HC Receiver, so
that they are only 10-20 cm apart (the Command Centre can be
moved after the initial setup).
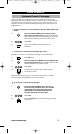
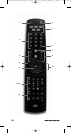
• Press the Light Device key on your remote control so that it is in Light
Mode.
• Press the number you wish to assign to the HC Receiver. If this is your
first Plug, number 1 is recommended, number 2 for the second etc.
The LED (underneath the Light Device key) should blink twice.
• Press and hold the button on the HC Receiver until the red light
begins to blink.
• Point your remote control towards the Command Centre and press the
Channel Up (+) key. The red light should stop flashing.
The remote should now operate the HC Receiver. To test it, check if the
Channel Up (+) and Channel Down (-) keys work to turn
your light on and off respectively, or if you have the HC8010 Dimmer
unit, see if the Volume up key begins to brighten or darken the light
(press again to stop).
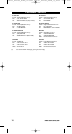
Extra Features
ONE FOR ALL Light Control
1
2
3
706155_URC7556_SCAND_10t:Ofa5_Digital_URC7555_SCAND_10_Talen 04-12-2007 16:47 Pagina 19