


RECORDING FUNCTION
Before recording, make sure:
●
The desired channel is selected by pressing the num-
ber buttons on the remote control or the CHANNEL
Up/Down button. (If you connected the VCR to a
cable box or satellite box as in "Basic connections"
on page 6, select the VCR to channel 3 or 4 the same
channel as the CH3 or CH4 switch on the back of the
VCR. Then, select the channel you want to record at
the cable box or satellite box. In this case, you can
ONLY record and view the SAME channel. )
●
There is a tape with its safety tab into the VCR.
●
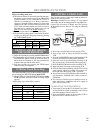
The desired recording speed is selected in SP(stand-
ard play) or SLP(super long play) mode by pressing
the TAPE SPEED button.
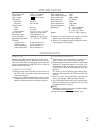
Tape Speed Recording/Playback Time
Type of tape
T60 T120 T160
SP mode 1 hour 2 hours 2-2/3 hours
SLP mode 3 hours 6 hours 8 hours
VIEWING AND RECORDING
THE SAME PROGRAM
1) Begin the recording by pressing the RECORD button.
●
To temporarily stop recording or resume it, press the
PAUSE/STILL button. After the VCR has been in
Pause mode for 5 minutes, it will stop automatically
to protect the tape and the video head.
2) Stop the recording by pressing the STOP button
when recording is completed.
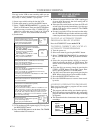
OTR(One Touch Recording)
This function enables you to set the recording length sim-
ply by pressing the REC/OTR button
on the VCR.
1) Begin OTR by pressing the REC/OTR button
on the
VCR
repeatedly until the desired recording length
appears.
●
Recording stops when 0:00 is reached.
Press Display Recorded Length
1 press (normal recording)
2 presses 0:30 30 minutes
3 presses 1:00 60 minutes
↓↓ ↓
17 presses 8:00 480 minutes
18 presses (normal recording)
COPYING A VIDEO TAPE
You can make copies of video tapes made by friends or
relatives for your enjoyment.
Warning:
Unauthorized recordings of copyrighted
video tapes may be an infringement of copyright laws.
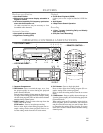
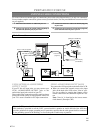
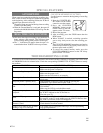
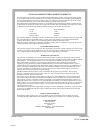
Connect the recording VCR(this unit), the playing
VCR(another source) and your TV using the following
diagram.
1) Insert a pre-recorded tape into the playing VCR.
2) Insert a tape with its safety tab into the recording
VCR.
3) Press the TAPE SPEED button on the recording VCR
to select the desired recording speed (SP/SLP).
4) Select the "Line-in" position on the recording VCR.
See page 6, under "Using audio/video input jacks".
5) Press the REC/OTR button on the recording VCR.
6) Begin playback of the tape in the playing VCR.
●
For best results during dubbing, use the VCR’s front
panel controls whenever possible. The remote con-
trol might affect the playing VCR’s operation.
●
Always use video-quality shielded cables with RCA-
type connectors. Standard audio cables are not rec-
ommended.
●
You can use a video disc player, satellite receiver, or
other audio/video component with A/V outputs in
place of the playing VCR.
TO MONITOR THE RECORDING
1) Turn on the TV and set the TV to channel 3 or 4. Now
set the CH3/CH4 switch on the back of the VCR to
match the channel selected on the TV.
2) Press the VCR/TV button on the recording VCR so
that the VCR/TV indicator comes on.
ANT in
[TV set]
(Use for monitoring)
[Playing VCR]
(another source)
Audio/Video cables
(not supplied)
Coaxial cable (supplied)
IN
OUT
AUDIO
VIDEO
IN
OUT
CH3 CH4
OUT
IN
ANT
AUDIO
VIDEO
OUT IN
[Recording VCR]
(this unit)
0J01
H7741
- 10 - EN