


- 15 - EN
1C29
SET UP FOR USE
You can program the tuner to scan all the channels you receive in your area.
NOTE: Channel memory programming is NOT needed when connected to a cable box or satellite box. Just
select the TV/DVD/VHS channel selector to the output channel of the cable box or satellite box (Ex CH3).
Then select the channel to be viewed on the Cable Box or Satellite Box.
CHANNEL SET UP FOR THE
FIRST TIME
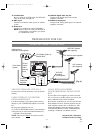
1 Plug in the TV/DVD/VHS power cord
Plug the TV/DVD/VHS power cord
into a standard AC outlet.
NOTE:
•
If some digits appear in the corner of
the screen, press the POWER button
without unplugging the power cord.
2 Turn on the TV/DVD/VHS
Press the POWER button to turn on the TV/DVD/VHS.
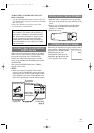
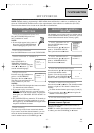
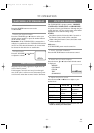
3 Select “ENGLISH” or “ESPAÑOL” or
“FRANÇAIS”
Select “ENGLISH” or
“ESPAÑOL”=Spanish or
“FRANÇAIS” =French using the
Arrow B or s button. “[ ]” indi-
cate the selected language.
4 Begin auto preset
Press the Arrow K or L button to
point to “AUTO PRESET”.
Then press the Arrow B button.
The tuner scans and memorizes all
active channels in your area.
NOTES:
•
The TV/DVD/VHS distinguishes between standard
TV channels and cable channels.
•
If you want to play or record a video tape
BEFORE presetting the tuner, you must press the
SETUP button on the remote control. To preset the
tuner again, see “CHANNEL SET UP AGAIN” on
page 15.
•
The TV/DVD/VHS may memorize TV channels as
CATV channels if reception conditions is poor. If
this happens, try AUTO MEMO action again when
reception condsitions are better.
5 After scanning
The tuner stops on the lowest memorized channel.
If you want to recall the selected channels, you can
select the desired channel directly with the remote
control number buttons or CHANNEL K or L.
DELETING (OR ADDING)
CHANNEL
The channels you no longer receive or seldom watch
can be deleted from the memory. (Of course, you can
add the deleted channel into the memory again.)
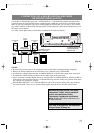
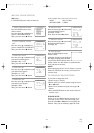
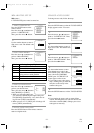
1 Select “CHANNEL SET UP”
Press the SETUP button on the
remote control.
Press the Arrow K or L button to
point to “CHANNEL SET UP”.
Then, press the Arrow B button.
2 Select “ADD/DELETE CH”
Press the Arrow K or L button to
point to “ADD/DELETE CH”.
Press the Arrow B button.
3 Enter the desired channel number
Press the Arrow K or L button until
your desired channel number
appears. (You can also use the num-
ber buttons or the CHANNEL K/L
button to enter it) (Example: CH8)
4 Delete (or add) it from (into) memory
Press the Arrow B or s button. The channel number
changes to light red. The channel is deleted from
memory.
•
To delete another channel, repeat steps [3] and [4].
•
If you press the Arrow B or s button again, the
channel is memorized again.
5 Exit the channel setup mode
Press the SETUP button on the remote control to
returns to TV mode.
NOTE: To confirm that channel(s) has been deleted
or added, press the CHANNEL K or L button.
Added channel: Light blue.
Deleted channel: Light red.
– SET UP –
B LANGUAGE
[ENGLISH] ESP FRA
AUTO PRESET
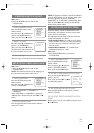
– SET UP –
LANGUAGE
[ENGLISH] ESP FRA
B AUTO PRESET
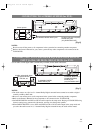
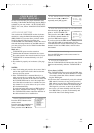
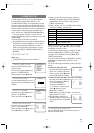
- TV/VCR SETUP -
TIMER PROGRAMMING
SETTING CLOCK
B CHANNEL SET UP
USER’S SET UP
V-CHIP SET UP
LANGUAGE [ENGLISH]
CAPTION [OFF]
ZERO RETURN
TIME SEARCH
INDEX SEARCH
– CHANNEL SET UP –
B ADD / DELETE CH (TV)
AUTO PRESET
08
ADD / DELETE
TV/VCR SECTION
TD350_01-35 01.5.21 4:41 PM Page 15