


RQT6974
Getting started
7
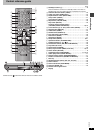
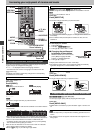
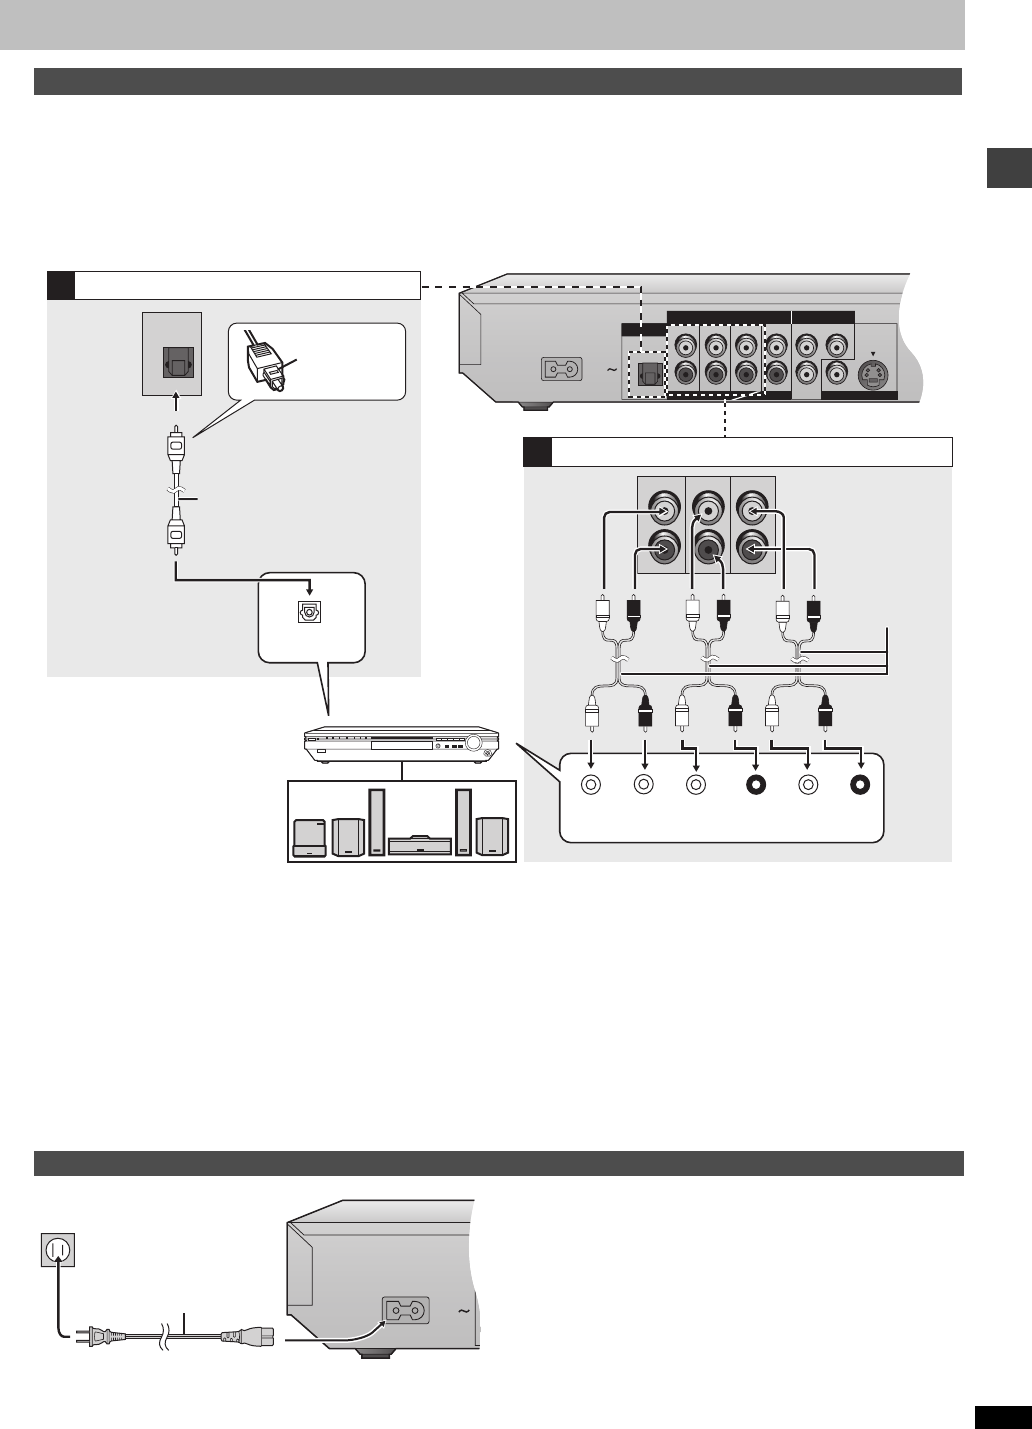
Enjoy the powerful movie theater and hall-like sound available with multiple channel audio found on DVDs by connecting an amplifier and speakers.
There are two types of connection, digital and analog.
\A\ DIgital
Connect an amplifier with Dolby Digital and DTS decoders to enjoy
surround sound.
You can also enjoy high-quality stereo sound with sampling frequencies of
88.2 and 96 kHz if the material isn’t copy-protected and the equipment
you connect is compatible with these signals.
\B\ Analog
Connect an amplifier with multi-channel audio input terminals to enjoy
surround sound.
This unit can decode Dolby Digital and DTS and there are no limitations
on sampling frequency with this kind of connection.
To obtain maximum performance of DVD-Audio multi-channel linear PCM
sound, the connections [B] below are recommended.
∫ Recording output
Digital recording
Connection [A] to digital recording equipment
≥With DVD, the following conditions must be met: a the disc doesn’t have
protection preventing digital recording, and b the recording equipment
can handle signals with a sampling frequency of 48 kHz.
≥You cannot record WMA/MP3.
When recording DVDs, make the following settings.
–Advanced Surround: OFF (➜ page 15)
–PCM Down Conversion: Yes (➜ page 21)
–Dolby Digital/DTS Digital Surround: PCM (➜ page 21)
Analog recording
There are no limitations on recording analog signals as there are with
digital signals.
≥Connect the equipment to the unit’s 2-channel AUDIO OUT (L/R)
terminals.
or
≥Select “2-channel” in “Speaker Setting” (➜ page 20) when connecting
the equipment to the unit’s FRONT(L/R) 5.1-channel AUDIO OUT
terminals.
Conserving power
This unit consumes a small amount of power, even when it is turned off
(1 W). To save power when the unit is not to be used for a long time,
unplug it from the household AC outlet.
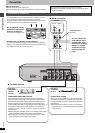
Home Theater – Enjoying more powerful sound
AC IN
OPTICAL
PB
PR
DIGITAL AUDIO OUT
(PCM/BITSTREAM)
COM
PONENT VIDEO OUT
(480P/480I)
AUDIO OUT
VIDEO OUT
S VIDEO OUT
SURROUND
L
R
SURROUND
FRONT R/R
LYFRONT L/L
R
5.1ch 2ch
CENTER
SUB
WOOFER
OPTICAL
A
OPTICAL
SURROUND
L
R
SURROUND
FRONT R/R
FRONT L/L
CENTER
SUB
WOOFER
CENTER
SUB-
WOOFER
SURROUND
(L) (R)
FRONT
(L) (R)
B
^
Analog connection
Insert fully,
with this side
facing up.
Optical digital audio cable
Do not bend sharply when
connecting.
Audio cable
Connect cables to
terminals
corresponding to the
speakers you have
connected.
Speakers (example)
Connect three or more speakers for
surround sound.
≥If you don’t connect a subwoofer, it
is advisable to connect front
speakers (L/R) capable of
producing bass of less than 100 Hz.
Amplifier
Digital connection
Set “Digital Audio output” to “On”
(➜ page 20).
Change “Digital output” (➜ page 21).
Change “Speaker setting” (➜ page 22).
≥Switch the attenuator on if sound is distorded with this
connection (➜ page 19).
≥You can connect to a digital
amplifier or system
component to enjoy stereo
or Dolby Pro Logic.
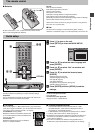
Power connection
AC IN
D
(
AC power supply cord
(included)
To household AC outlet
(AC 120 V, 60 Hz)