


19
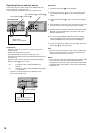
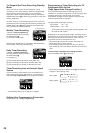
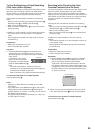
5 Press the OFF button C to set the
ending time.
6 Press the SPEED button B to set the desired tape
speed.
– SP provides standard recording
time, optimum picture and sound
quality.
LP provides double recording
time with slightly reduced picture
and sound quality.
EP provides triple recording time with slightly reduced
picture and sound quality.
Regarding the [A] indication, refer to page 20.
When you play back a tape recorded in the EP mode,
the monaural sound may be unstable.
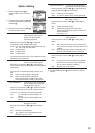
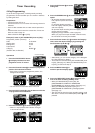
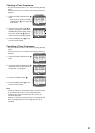
7 Press the Cursor button (1) S to select the Category.
Then, select the desired category by pressing the
Cursor buttons (3421) S.
– Alternatively, you can set the category on the Navigator
list. (See page 23 for details.)
– This function is activated when [JET NAVIGATOR] is set
to [ON]. (See page 13.) When [JET NAVIGATOR] is set
to [OFF], procced to the step 9.
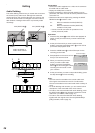
8 Press the MENU button U to
make the previous display appear.
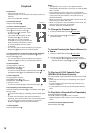
9 Press the TIMER (REC) button A to switch the VCR
over to the timer recording standby mode.
– When [JET NAVIGATOR] is set to [ON], the
[PROGRAMME IS COMPLETE. REMAINING
PROGRAMME 49.] message appers. (See page 13.)
– When [JET NAVIGATOR] is set to [OFF], the
[PROGRAMME IS COMPLETE.] message appears.
(See page 13.)
– The VCR will be set to the timer recording stanby mode
after about 1 minute if the TIMER (REC) button A is not
pressed.
CATEGORY
CH DATE ON OFF
SP–– ––:–– ––:––––––
CATEGORY
CH DATE ON OFF
SP2 ––:–– ––:––––––
CATEGORY
CH DATE ON OFF
SP2 ––:–– ––:––––––
CATEGORY
CH DATE ON OFF
SP2 ––:–– ––:––27SA
CATEGORY
CH DATE ON OFF
SP2 ––:–– ––:––27SA
CATEGORY
CH DATE ON OFF
SP2 20:02 ––:––27SA
CATEGORY
CH DATE ON OFF
SP2 20:02 ––:––27SA
CH DATE ON OFF
SP2 20:02 21:3027SA
CATEGORY
CH DATE ON OFF
LP2 20:02 21:3027SA
CATEGORY
On Screen Display
END : MENU
CATEGORY SETTING
≥MOVIE
≥MUSIC
≥DRAMA
≥EDUCA
≥DOCUM
≥SPORT
≥CHILD
≥NEWS
≥OTHER
≥
–––––
END : MENU
CATEGORY SETTING
≥MOVIE
≥MUSIC
≥DRAMA
≥EDUCA
≥DOCUM
≥SPORT
≥CHILD
≥NEWS
≥OTHER
≥
–––––
CH DATE ON OFF
LP2 20:02 21:3027SA
CHECK
: PROG./CHECK
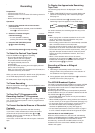
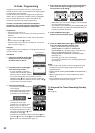
Timer Recording
4-Key Programming
Up to 16 timer programmes, including weekly and daily
programmes, can be recorded up to one month in advance
by setting the timer.
Preparations
– Confirm that the VCR is on.
– Confirm that the TV is on and the VCR viewing channel is
selected.
– Insert a video cassette with an intact erasure prevention
tab.
– Check that the clock is set to the correct time. If it has not
been set, refer to page 10.
– Set the VCR/TV switch E to [VCR].
Example (In case of [JET NAVIGATOR] is set to [ON].):
Programme position (channel); 2
Date; 27 October
Starting time; 20:02
Ending time; 21:30
Tape speed; LP
Category; MUSIC
(Present date; 16 October)
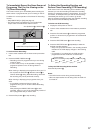
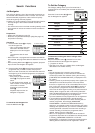
Operations
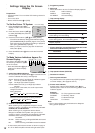
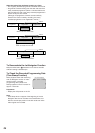
1 Press the PROG./CHECK button
< to display the menu for timer
programme on the TV screen.
2 Press the Channel button 9 to select the programme
position of the desired TV station.
– Every time you select the programme position, the
background changes.
– The next item will flash after about 2 seconds.
3 Press the DATE button : to set the date on which the
TV programme will be broadcast.
4 Press the ON button D to set the starting time.
– When it is kept pressed, the indication changes
in 30 minute intervals.