12
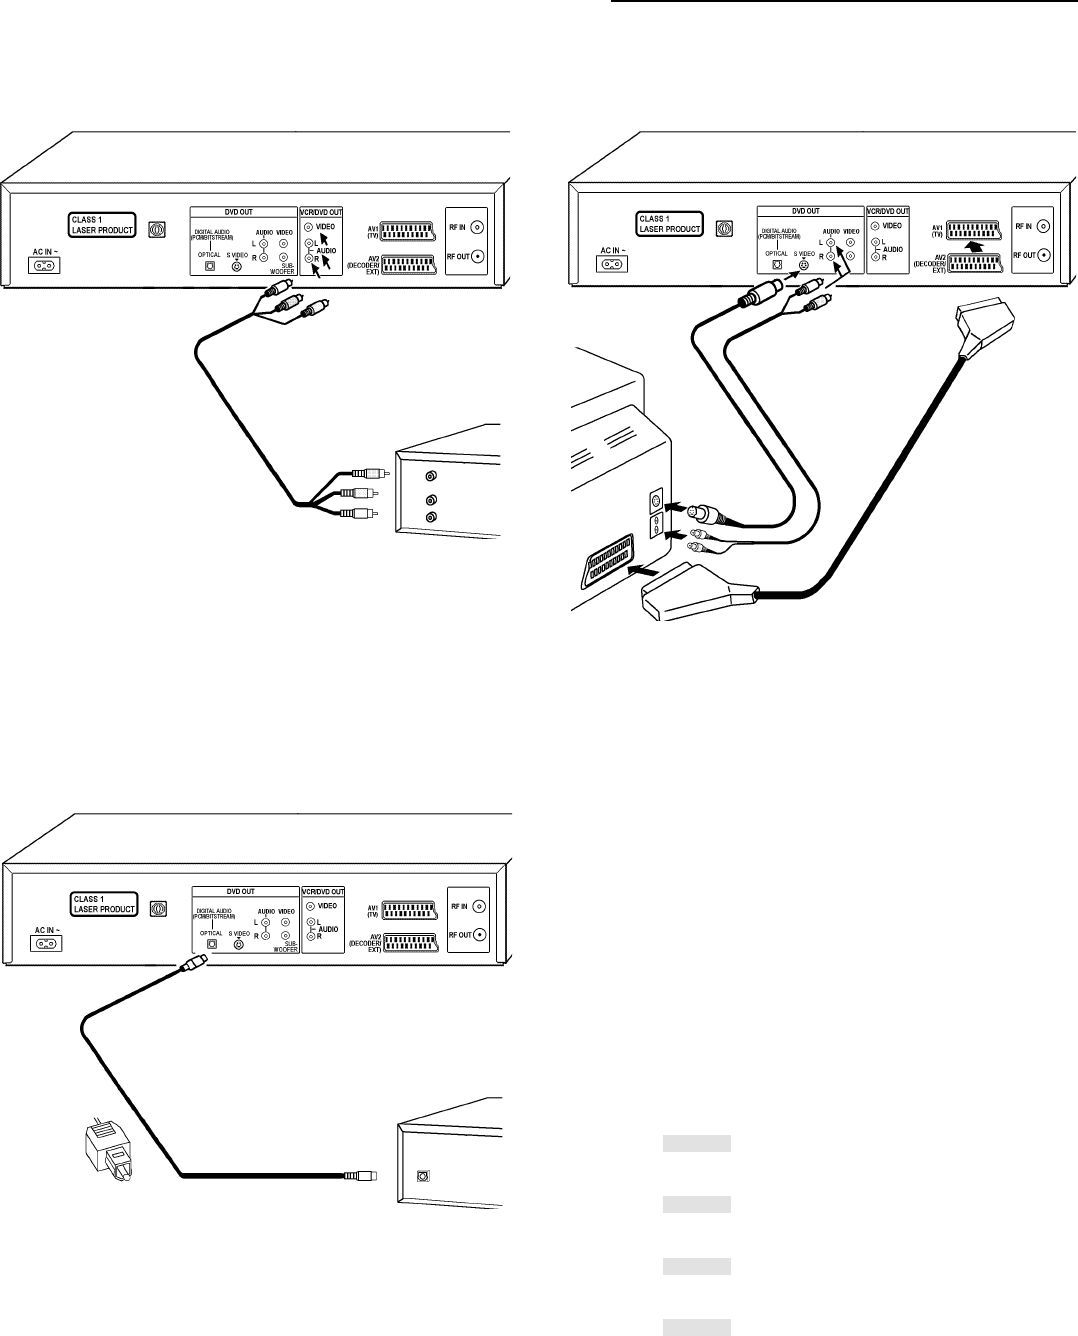
Connecting with S-VIDEO lead
The S-VIDEO terminal achieves a more vivid picture
than the VIDEO OUT terminal (only DVD OUT).
21 pin scart lead
(not supplied)
Connecting with Audio / Video cable
Connect the Audio / Video cable (white=L, red=R, yellow=video) according
to the colours / markings of the terminals.
You can choose the DVD picture by changing the TV channel.
Note: Do not connect the unit through another video cassette recorder.
Connect directly to the TV, otherwise the picture may not be displayed
correctly due to the copy guard.
Connecting External Equipment
S Video lead
(not supplied)
Stereo Audio lead
(not supplied)
White = Audio L
Red = Audio R
VCR / DVD
If your TV is supporting RGB, then connect a 21 pin scart lead with
AV1 (TV) to reach the best picture quality for DVD playback,
For RGB setting see page 18.
Analogue recording: You can record to a Mini Disc (MD) or audio cassette
or connect to a Dolby Pro Logic amplifier.
Connecting with Optical digital audio lead
Digital amplifiers with a built-in decoder
or a decoder-amplifier combination,
Mini Disc or CD recorder
(not supplied)
VCR / DVD
Optical digital
audio lead
(not supplied)
Select [Yes] in [PCM Down conversion] (see page 18).
Adjust the settings to suit the equipment you have connected.
Note: You cannot use DTS Digital Surround decoders not suited to DVD.
You can record the digital signal directly onto an MD. The recording
equipment should handle a sampling frequency of 48 kHz/16 bit .
Change the settings in the SETUP menu [AUDIO] as follows.
PCM Down conversion: [Yes] Dolby Digital: [PCM]
DTS Digital Surround: [Off] MPEG : [PCM]
Note: VCR audio signal is not connected to DVD OUT terminal.
Insert fully,
with this side facing up
Connecting an Active subwoofer
You can enjoy more powerful bass by connecting an active subwoofer.
Turn the BASS-function to [BASS PLUS ON] to boost
the output from the subwoofer (see page 17).
Adjust the volume of the subwoofer to suit your preference.
Change of initial settings
PCM-Down [Yes] connected an amplifier with an optical digital audio lead.
conversion [No] connected an amplifier with audio leads.
Dolby Digital [PCM] connected an unit without a built-in Dolby Digital decoder.
[Bitstream] connected an unit with a built-in Dolby Digital decoder.
DTS Digital [Off] connected an unit without a built-in DTS decoder.
Surround [Bitstream] connected an unit with a built-in DTS decoder.
MPEG [PCM] connected an unit without a built-in MPEG decoder.
[Bitstream] connected an unit with a built-in MPEG decoder.
IMPORTANT
If the equipment you connected cannot decode the signal, the setting must be
changed to default settings. If not, signals the equipment cannot process will be
output by this unit, causing high levels of noise which can damage your hearing
and the speakers.
TV
(not supplied)
Note:
If you connect an amplifier with Dolby Pro Logic decoder you will also
need to connect center and surround speakers to enjoy surround sound.
The Dolby Pro Logic decoder will not function correctly if
[A.SRD] (ADVANCED SURROUND) and [BASS PLUS] is on.
Turn [A.SRD] and [BASS PLUS] off.
White = Audio L
Red = Audio R
Yellow = Video
VCR / DVD
Audio / Video cable
(not supplied)
Home Theatre
or TV set
(not supplied)
RQTD0035-A


