


21
Advanced
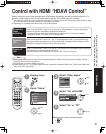
Control with HDMI “HDAVI Control”
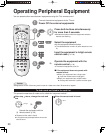
Operating Peripheral Equipment
Other adjust
Auto power on
Prog-out stop
Off
Off
Ctrl with HDMI
On
Standard
Power save
Menu
Picture
Audio
Lock
Setup
Timer
Setup
CH scan
ALL
Language
Program channel
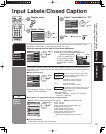
Input labels
CC
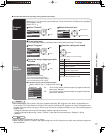
Other adjust
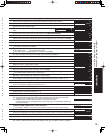
Control with HDMI “HDAVI Control”
Newer Panasonic audio-video products with HDMI output connections can be controlled using the TV’s
remote. Limited features such as automatic switching to the TV’s HDMI input are available.
•
This feature is limited to models incorporating Panasonic’s “Control with HDMI”. Refer to the models listed on page
22 or the individual instruction manuals for compatibility information.
•
Depending on the cable used, this function may not be possible.
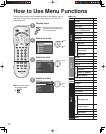
Display menu
Select “Ctrl with HDMI”
Select “Setup”
Select “On” or “Off”
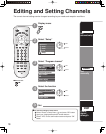
■
Press to exit or return to previous screen
Select “Other adjust”
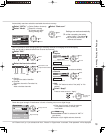
When “Ctrl with HDMI” is set to “On”, at the start of DIGA playback, TV input automatically
switches to the input compatible with playback equipment.
•
If using DIGA operation and the DIGA menu is displayed, the TV input automatically
switches to DIGA. If TV power is Off, it switches On.
When “Ctrl with HDMI” is set to “On”, the TV is automatically turned on and switched to the
appropriate HDMI input whenever a “Control with HDMI” compatible DIGA (Panasonic DVD
Recorder) is initially turned on and Play mode is selected.
When “Ctrl with HDMI” is set to “On” and the TV is turned off, the connected DIGA (Panasonic
DVD Recorder) is also automatically turned off.
•
DIGA (Panasonic DVD Recorder) will not turn off if it is still in rec mode.
Power off
link
Power on
link
Automatic
input
switching
•
Before using HDMI control functions, the connected equipment (DIGA) must also be set. For details, see the
operation manual for each equipment.
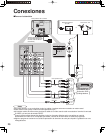
•
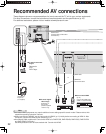
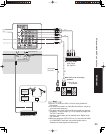
For equipment connection details, see p. 22.
•
Default setting is “On”. If no HDMI equipments are connected or standard HDMI (non- “Control with HDMI”) are
used, set to “Off”. (see below)
Note
4
5
1
2
3
select
next
select
next
select
change