


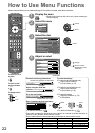
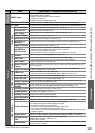
How to Use Menu Functions (Picture, sound quality, etc.)
Advanced
25
Menu Item Adjustments / Configurations (alternatives)
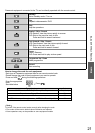
Sound
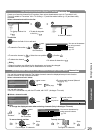
HDMI1 Input
Select to fit the input signal (Digital / Analogue) (p. 48)
Digital: HDMI cable connection
Analogue: HDMI-DVI adapter cable connection
HDMI input mode only
HDMI2 terminal is for digital signal only
●
●
Reset Sound Defaults
Press the OK button to reset the present Sound Menu to the default settings
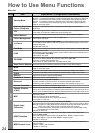
Setup
Off Timer
Sets the time the TV automatically turns Off (Off / 15 / 30 / 45 / 60 / 75 / 90 minutes) (p. 15)
Tuning Menu
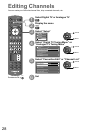
Favourites Edit
Creates list of favourite channels (Digital TV mode) (p. 29)
Channel List
Skips the unwanted channels (p. 29)
Auto Tuning
Sets all Digital TV or Analogue TV channels automatically (p. 30)
Manual Tuning
Sets the TV channels manually (p. 31)
Update Channel List
Update the channel list (Digital TV mode) (p. 31)
New Channel
Message
Displays a message when new Digital TV channels are found. (Off / On) (p. 31)
Signal Condition
Checks the Digital TV signal condition (p. 31)
Add MPEG-4
AVC Channels
Activates the reception of MPEG-2 and MPEG-4 AVC channels
Use this function if MPEG-4 AVC services start in your area.
All previous tuning settings are erased.
Once activated, this option is removed from the Digital TV Tuning Menu.
●
●
●
Display Settings
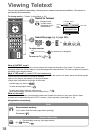
Teletext
Teletext display mode (TOP (FASTEXT) / List) (p. 18)
Side Panel
Increases the brightness of the side panel (Off / Low / Mid / High)
The recommended setting is “High” to prevent panel “image retention”.
●
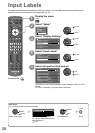
Input Labels
Labels or skips each input mode (p. 26)
Banner Display
Timeout
Sets how long the information banner stays on screen from 0 (No display) to 10 sec. in
1-sec. increments
Playing Time Display
Displays the length of time in every thirty minutes for playing game (Off / On)
When “Viewing Mode” is set to “Game”
●
VIERA Link Settings
VIERA Link
Sets to use VIERA Link functions (Off / On)
VIERA Link functions become available when “VIERA Link” is set to “On”.
●
Power on Link
Sets to use Power on Link functions (Off / On) (p. 39)
Power off Link
Sets to use Power off Link functions (Off / On) (p. 39)
Standby Power Save
Controls the power consumption in Standby mode of the connected equipment to
reduce the consumption (Off / On) (p. 39)
Intelligent Auto
Standby
Makes unwatched or unused connected equipment go into Standby mode to reduce the
power consumption (Off / On (With reminder) / On (No reminder)) (p. 39)
System menu
Shipping Condition
Resets all settings to the original condition (p. 32)
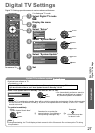
System Update
Downloads new software to TV (p. 27)
Software Licence
Displays the software licence information
System Information
Displays the system information of this TV
Other Settings
Power Save
Reduces brightness of picture to minimise power consumption (Off / On)
Picture Overscan
Selects the screen area for displaying the image (Off / On)
On: Enlarges the image to hide the edge of the image.
Off: Displays the image in the original size.
Set to “On” if noise is generated on the edges of the image.
This function is available when aspect is set to “16:9”.
This function can be memorized separately for SD (Standard Definition) and HD (High
Definition) signals.
●
●
●
Region Select
Selects the region where you live to adjust the standard time (NSW / ACT / Victoria /
Queensland / South Australia / Western Australia / Northern Territory / Tasmania)
(p. 15)
Daylight Saving
Time
Select time offset from the standard time for Summer Time
(Auto / Off / +1/2 hour / +1 hour) (p. 15)
Set to “Auto” normally
●
Refresh Rate
Changes the image processing of the panel (depending on the input signal) (50Hz / 100Hz)
Set to “100Hz” normally●
A different menu will be displayed while PC, DVI to HDMI adapter cable or SD Card is used. (p. 33 - 37)
Only available items can be selected.
●
●