7 of 10
ISSUED: 10-12-05 SHEET #: 202-9038-6 05-19-07
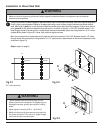
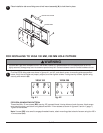
FOR VESA 200 MOUNTING PATTERN:
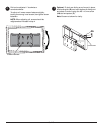
Thread two M4 x 12 mm screws (BB), leaving .25" exposed thread, into top holes on back of screen. Hook screen
onto mounting plate, and attach using two bottom M4 x 12 mm screws as shown in figures 4.3 and 4.4. Tighten all
four screws.
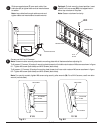
FOR SCREENS WITH VESA MOUNTING PATTERN IN A POCKET:
Thread two retaining spacers (L) onto two M4 x 20 mm screws (CC), leaving .25" exposed thread as shown in figure
4.5. Thread M4 x 20 mm screws with retaining spacers into top holes on back of screen. Hook screen onto mounting
plate, and attach using bottom two M4 x 20 mm screws and retaining spacers as shown in figures 4.3 and 4.4.
Tighten all four screws.
MOUNTING PLATE
(NOTE: MOUNTING PLATE
SHOWN WITHOUT FULL
WALL MOUNT ASSEMBLY
FOR CLARITY)
fig. 4.3
fig. 4.4
MOUNTING PLATE
(NOTE: MOUNTING PLATE
SHOWN WITHOUT FULL
WALL MOUNT ASSEMBLY
FOR CLARITY)
Note: Flat panel screen
may appear slightly
different than illustrated.
For screens with a hole
pattern in a pocket,
spacers (L) go between
mounting plate and
screen.
fig. 4.5
K
GENERIC
ADAPTER
BRACKET
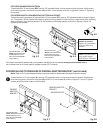
FOR INSTALLING TO PEERLESS PLP MODEL ADAPTER BRACKET (not UL listed)
Note: Refer to PLP model adapter bracket instruction sheet for attachment of adapter bracket to screen.
Thread two M10 x 15 mm screws (K), leaving .25" exposed thread, into top holes on back of screen. Hook screen
onto mounting plate, and attach using two bottom M10 x 15 mm screws as shown in figures 5.7 and 5.8. Tighten
screws using 6 mm allen wrench (not included).
5
For screen compatibility please refer to the plasma interface list on our website www.peerlessmounts.com or
call customer care for a screen specific adapter bracket (PLP models).
K
GENERIC ADAPTER
BRACKET
MOUNTING PLATE
fig. 5.7
fig. 5.8
MOUNTING PLATE
(NOTE: MOUNTING PLATE
SHOWN WITHOUT FULL
WALL MOUNT ASSEMBLY
FOR CLARITY)


