


4 C2612M-A (6/06)
Prepare Unit for RAM Installation
OPEN THE UNIT CHASSIS
1. If the DX8000 is mounted in a rack, remove it and transport it to an area that will provide full access to the unit chassis:
a. Disconnect any cables or connections that might restrict access to or the removal of the unit.
b. Unscrew the fasteners that are securing the unit in the rack.
c. Carefully lift the unit out of the rack.
NOTE:
Removing the DX8000 from a rack may require more than one person. Refer to the DX8000 Installation Manual for rack
mounting information.
2. Place the DX8000 on a flat surface with ample workspace.
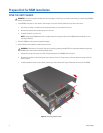
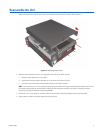
3. Using a Phillips-head screwdriver, remove the chassis cover:
a. Remove the two top-most screws on the left and right side panels of the DX8000. Refer to Figure 5.
b. Remove the four silver screws fastening the cover to the rear of the unit. These screws are the ones closest to the top of the unit.
Refer to Figure 5.
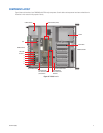
c. Carefully remove the chassis cover by sliding it back and up. Set aside the cover. Figure 6 illustrates the interior of the DX8000.
Figure 5.
Removing Chassis Cover
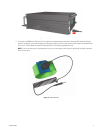
WARNING:
The chassis assembly includes parts with sharp edges. To avoid injury, use caution when working in and around the DX8000’s
chassis and components.
WARNING:
Make sure unit is turned off and you are wearing a properly grounded ESD wrist strap before attempting to open the
DX8000 chassis cover. Refer to the Getting Ready section.