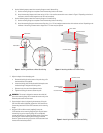
b. Use the following steps to attach the mounting flange to a steel I-beam ceiling:
(1) Use the mounting flange as a template to mark the mounting holes on the I-beam.
(2) Attach the mounting flange to the I-beam using 1/4-20 x 1-inch machine screws with nuts as shown in Figure 2. Depending on the size of
the I-beam, machine screws longer than one inch may be required.
c. Use the following steps to attach the mounting flange to a concrete ceiling:
(1) Use the mounting flange as a template to mark the mounting holes on the ceiling.
(2) Attach the mounting flange to the concrete ceiling using 1/4 x 1.75-inch wedge concrete anchors with washers and nuts. Depending on the
thickness of the ceiling, concrete anchors longer than 1.75 inches may be required.
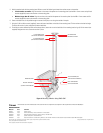
2. Adjust the length of the telescoping pole.
a. Remove the locking pin at the center of the pole using a flat
head screwdriver (not supplied).
b. Loosen the locking collar on the pole and slide the pole out to
the desired length. Retighten the locking collar.
c. Reinsert the pin into one of the adjustment holes.
d. Tighten the locking pin screw to secure the pole.
3. Secure the pipe in place by tightening the setscrews. Using the
3/32-inch Allen wrench (supplied), tighten the 10-32 setscrew on
the mounting head and the two 10-32 setscrews on the mounting
flange.
4. Using the 3/32-inch Allen wrench (supplied), loosen the
10-32 setscrew on the mounting flange ball joint. Slightly loosen
the retaining ring on the mounting flange. Do not completely
unscrew the retaining ring. Rotate the lower section of the mount
at the ball joint until the mounting head is facing the desired
direction. Tighten the retaining ring and the 10-32 setscrew to lock
the mount into the desired position.
WARNING: The mount is designed to rotate at the swivel ball
joint on the mounting flange. Do not rotate the mount at the joints
where the pole screws into the mount.
STEEL I-BEAM
NUT/LOCK WASHER
MACHINE SCREWS
WOOD BEAM
WOOD SCREW
CONCRETE CEILING
CONCRETE WEDGE
ANCHOR
NUT/LOCK WASHER
Figure 3. Attaching the Mount to Concrete Ceiling
Figure 1. Attaching the Mount to Wood Stud Ceiling
Figure 2. Attaching the Mount to I-beam Ceiling