


6
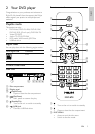
3 Connect
Make the following connections to use this product.
Basic connections:
Video•
Audio•
Optional connections:
Route audio to other devices:•
Digital amplifier/receiver•
Analog stereo system•
USB flash drive•
Connect audio/video cables
• Option 1: Connect to component video jacks
(for a standard TV or Progressive Scan TV).
• Option 2: Connect to video (CVBS) jack (for a
standard TV).
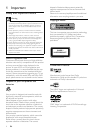
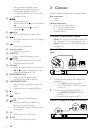
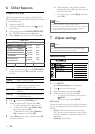
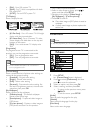
Option 1: Connect to component video
jacks
1 Connect the component video cables (not
supplied) to:
the • Y Pb Pr jacks on this product.
the COMPONENT VIDEO input jacks •
on the TV.
2 Connect the audio cables (supplied) to:
the • AUDIO OUT L/R jacks on this
product.
the audio input jacks on the TV.•
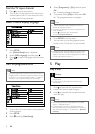
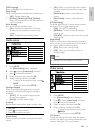
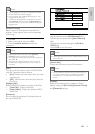
Option 2: Connect to video (CVBS) jack
TV OUT
Y
Pb
COMPONENT
Pr
VIDEO OUT
L
R
AUDIO OUT
Pb
COMPONENT
VIDEO IN
Y
Pr
Pb
COMPONENT VIDEO OUT
Y
Pr
TV OUT
Y
Pb
COMPONENT
Pr
VIDEO OUT
L
R
AUDIO OUT
VIDEO IN
TV OUT
During a photo slideshow, switch •
between the Fun Mode (color) and
Simple Mode (black and white).
For VCD and SVCD, turn on or off PBC •
(playback control).
d
Navigate the menus.•
Search fast-forward (•
) or fast-backward
(
).
Search slow-forward (•
) or slow-
backward (
).
e
BACK
Return to the previous display menu.•
f
/
Skip to the previous or next title, chapter, •
or track.
g
Switch to the USB mode.•
h Numeric buttons
Select an item to play.•
i SUBTITLE
Select a subtitle language on a disc.•
j
ZOOM
Fit the piture display to the TV screen.•
Zoom the picture in or out.•
k VOLUME
Display the current volume level and use •
(
) or ( ) navigation buttons to set the
volume level between 0 ~ 20.
l REPEAT/REPEAT A-B
Select or turn off repeat mode.•
Repeat play for a specific section.•
m AUDIO/CREATE MP3
Select an audio language or channel on •
a disc.
Access the menu of creating MP3 files.•
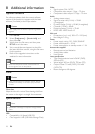
n
Stop play.•
o
Start, pause or resume disc play.•
p
INFO
For discs, access the play options or •
display the current disc status.
For slideshows, display a thumbnail view •
of photo files.
q OK
Confirm an entry or selection.•
r SETUP
Access or exit the setup menu.•
EN