


13
Karaoke
You can connect a microphone (not supplied) to sing
along with a music source.
Note
Before you connect a microphone, set the microphone •
volume to the minimum to prevent howling.
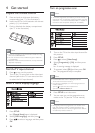
1 Turn on the TV, and select the TV input
channel.
2 Connect a microphone to the MIC jack on this
product.
3 Turn on the microphone sound output (see
“Adjust Karaoke settings”).
4 Play a Karaoke disc and sing through the
microphone.
Adjust Karaoke settings
Note
You need to turn on the microphone sound output in •
the [Microphone] option to activate karaoke-related
menu options.
1 Press KARAOKE.
The karaoke settings menu is displayed. »
2 Select an option, and then press OK.
3 Change or set a setting, and then press OK.
4 Press KARAOKE again to exit the menu.
[Microphone] - Turn on or off the microphone
sound output.
[MIC Volume] - Adjust the microphone volume.
[Echo] - Adjust the echo level.
[Karaoke Scoring] - Turn off the function of
Karaoke scoring or select a scoring level (basic/
intermediate/advance). If a level is selected, the
score is displayed after each song ends.
[Karaoke Idol] - Song contest among 4 singers.
1) In the [Karaoke Scoring] option, select a level
(basic/intermediate/advance).
2) In the [Karaoke Idol] option, turn on the
contest.
The song selection menu is displayed. »
3) Input a track (VCD/SVCD) or a title/chapter
(DVD) as the first song. Up to 4 songs can be
selected.
4) Then select [Start], and press OK to start play
selected songs.
After all the selected songs end, a contest »
result is displayed.
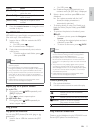
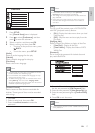
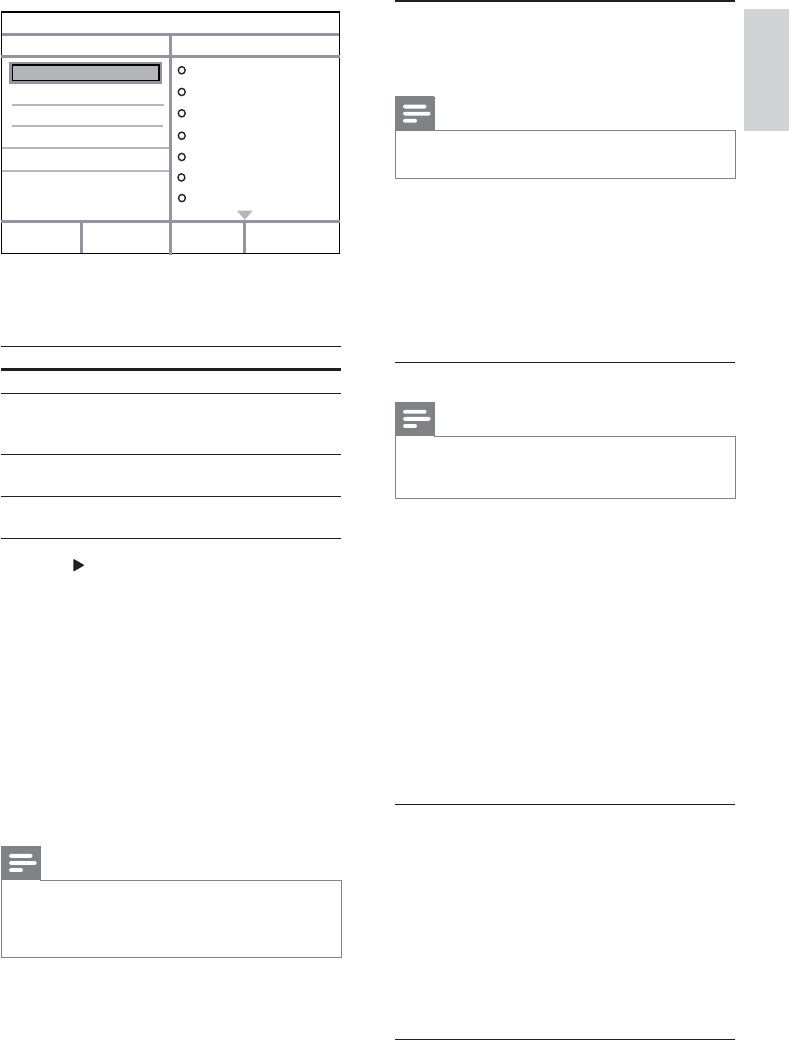
5 Select a conversion option in the [OPTIONS]
panel, and then press OK repeatedly to select
an item.
Option Description
[Speed] Select a copying speed.
[Bitrate] Select a quality level.
Higher bitrate for better sound
quality and bigger file size.
[CRT ID3] Copy track information into the
MP3 file.
[Device] The created files can only be saved
in a USB flash drive.
6 Press to access the [TRACK] panel.
7 Select an audio track, and then press OK.
To select another track, repeat step 7.•
To select all tracks, select • [Select all] in
the menu, and press OK.
To deselect all tracks, select • [Deselect
all] in the menu, and press OK.
8 Select [Start] in the menu, and then press OK
to start to convert.
Once complete, a new folder is created »
automatically in the USB flash drive to store
all the new MP3 files.
To exit the menu, select • [Exit], and then
press OK.
Note
When you convert, never press any button. •
DTS CDs and copy-protected CDs cannot be converted. •
Writer-protected or password-protected USB flash •
drives cannot be used to store MP3 files.
Create MP3
OPTIONS
TRACK
SUMMARY
Start Exit
Select all
Deselect all
to change speed.
Track01 04:14
Track02 04:17
Track03 03:58
Track04 04:51
Track05 03:53
Track06 04:09
Track07 04:38
Press [OK] button
CRT ID3 Yes
Device USB 1
Speed Normal
Bitrate 128kbps
English
EN