


8
Turn on progressive scan
Note
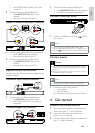
To use the progressive scan feature, you must connect a •
progressive scan TV with the component video jacks (see
“Connect” > “Connect audio/video cables” > “Option 2:
Connect to the component video jacks” for details).
1 Turn on the TV to the correct video input
channel for this product.
2 Press SETUP.
3 Press to select [Video Setup].
4 Select [Progressive] > [On], and then press OK.
A warning message is displayed. »
5 To proceed, select [Ok] and then press OK.
The progressive setup is complete. »
Note
If a blank/distorted screen is displayed, wait for •
15 seconds for the auto recovery.
If no picture is displayed, turn off the progressive scan
•
mode as follows:
1) Press
to open the disc compartment.
2) Press the Numeric button ‘1’.
6 Press SETUP to exit the menu.
7 You can now turn on the progressive scan
mode on the TV (see the TV user manual).
Note
During play, when the progressive scan mode is on for •
both this product and the TV, distorted picture may
display. In this case, turn off the progressive scan feature
on both this product and the TV.
Note
If you are not going to use the remote control for a long •
time, remove the batteries.
Do not mix batteries (old and new or carbon and
•
alkaline, etc.).
Batteries contain chemical substances, so they should be
•
disposed of properly.
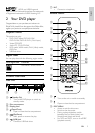
Find the TV input channel
1 Press to turn on this product.
2 Turn on the TV and switch to the video input
channel (refer to the TV user manual on how
to select the A/V input channel).
Select menu display language
Note
If this product is connected to a HDMI CEC compliant •
TV, skip this setting. It switches automatically to the
same OSD menu language as per your TV setting (if the
language set on TV is supported by this product).
1 Press SETUP.
» [General Setup] menu is displayed.
2 Select [OSD Language], and then press .
3 Press to select a language, and then press
OK.
EN