


User Manual BDS4223V
22
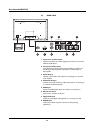
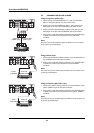
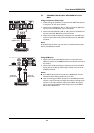
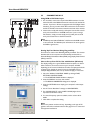
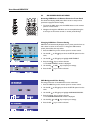
5.5 CONNECTING A PC
Using RGB or DVI Video Input
1 For most PC's, connect the 15-pin D-Sub RGB connector from the
back of the PC to the RGB-IN Connector located on the back of the
monitor. If you have a PC that is equipped with a DVI (Digital Visual
Interface), you may connect the PC DVI connector from the back of
the PC to the DVI-In Connector located on the back of the monitor.
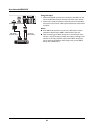
2 Connect the red (R) and white (L) audio jacks from the PC to the R
and L jacks located next to the RGB connector. If you are using a
DVI interface, simply connect the (R) and (L) audio jacks to the R
and L jacks located next to the DVI connector.
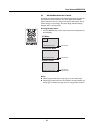
Note:
■ A RGB loop-out labeled "RGB Out" will allow another RGB monitor
to be connected. The RGB loop-out will monitor the same signal as
the RGB In signal source.
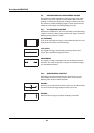
Setting Up Your Monitor Using Plug and Play
This monitor is conform the VESA Plug and Play standaard. The monitor
identifies itself to the computer and automatically sends the PC its
Extended Display Identification Data (EDID) using Display Data Channel
(DDC) protocols.
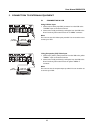
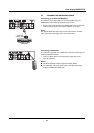
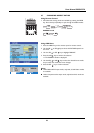
How to Set up Your PC for Use with Monitor (Windows)
The display settings for a typical Windows-based computer are shown
below. However, the actual screens on your computer will differ
depending on the version of Windows and video card equipped with the
computer. Even though the actual screen may look different from
example displayed below, basic set-up routine will apply in most cases.
1 Go to the Window's CONTROL PANEL by clicking START,
SETTINGS, CONTROL PANEL.
=> The CONTROL PANEL Window is displayed.
2 Select the DISPLAY icon from this window.
=> The DISPLAY PROPERTIES dialog box is displayed.
3 Select the SETTINGS tab to display your computer's video output
settings.
4 Set the "Screen Resolution" settings to 1024x768 PIXELS.
5 For COLOR QUALITY, select 24 BIT COLOR (might also be
expressed as 16 million colors).
6 If a vertical-frequency option is available, set the value to 60 or
60 Hz.
7 Click OK to complete the setting.
Note:
Both screen position and size will vary, depending on the type of PC
graphics card and its resolution selected. See page 51 for an overview of
the supported resolutions.