


6
EN
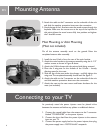
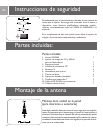
Mounting Antenna
2. Attach the cable to the F connector on the underside of the unit
and slide the weather protection boot over the connection.
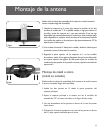
3. Hook the top of the L brackets onto the wood screws through the
keyholes. Make sure the screws are at the top of the keyhole. At
this point tighten the wood screws fully into position and tighten
the L bracket screws.
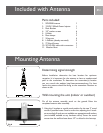
Mast Mounting or Attic Mounting
(Mast not included)
Do all the antenna assembly work on the ground. Raise the
completed antenna after assembly.
1. Install the two U-bolt s from the rear of the main bracket.
2.
Attach the main bracket to the antenna assembly using the 6 - 1/2”
washer scr
ews as shown in Figure B above.
3. Attach the U-Bolt clamps with the pointed side facing outward.
4. Place the 4 wing-nuts on the threads of the U-bolts – loosely
allowing space for the mast.
5. Slide the top of the mast under the clamps – and fully tighten the
wing-nuts.The completed assembly should look like figure C.
6. Attach the cable to the F connector on the underside of the unit
and slide weather protection boot over the connection.
7. Attach the mast to the mast mount and fasten hardware for the
mast (not included).
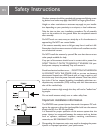
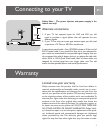
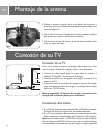
As previously noted the power injector must be placed in-line
between the antenna and before any splitter or additional devices.
1.
Connect the coaxial cable from the antenna to the F connector
labeled “TO AMPLIFIER” on the power injector.
2. Connect the short lead from the power injector to the antenna
input on y
our TV.
3. Connect the power supply lead to the power injector, then plug
the power supply into a 110/120 Volt AC receptacle.
Fig C
Connecting to your TV
Fig B