


6
diagram and guide of how to mount
properly on the wall.
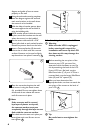
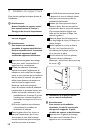
2 Using the enclosed mounting template,
place the diagram against the wall and
mark two locations on the wall where
the mount Is to be Installed.
3 With the help of another person, place
the mount against the wall and level it
using the bubble guide.
4 While another person holds the mount
in place, mark two locations on the wall
where the mount is to be installed.
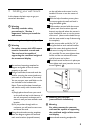
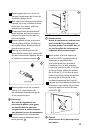
5 Set the mount aside and drill a 5/16”
(8mm) pilot hole at each marked location.
Remove any excess dust from the holes.
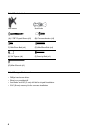
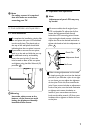
6 Insert a Concrete Anchor (B) into each
hole so that it is flush with the concrete
surface. A hammer can be used to lightly
tap the anchors into place if necessary. 2
2
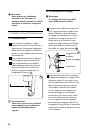
7 Place the mount back against the wall
and secure it using the wood screws
(A) provided. Do not over-tighten these
screws and do not release the mount
until all screws are in place.
D
Note
If the concrete wall is covered
by a layer of plaster or drywall,
the concrete anchor must pass
completely through the layer to rest
ush with the concrete surface.
8 Once both wood screws are in place you
must tighten each one. Be sure not to
over tighten. 3
3
3.3 Attaching the arm to the LCD
B
Warning
Make sure the LCD is unplugged
before starting this step of the
installation and never lay the LCD
face down as this may damage the
viewing surface.
1 Before attaching the arm piece of the
mount to your LCD, you must first
determine which hardware to use. Do
this by examining the back of the LCD.
If your LCD has a flat back, use the
M4x12mm bolts (C). If your LCD has a
recessed back, use the longer M4x30mm
bolts (D) and 3/4” spacers (E).
2 After you have determined the
appropriate bolts, use them to attach the
arm piece of the mount to the back of
your LCD. 4
4
E
Tip
Be careful not to over-tighten the
bolts.