


7
D Note
For safety reasons it is required
that all 4 bolts are used when
mounting your TV.
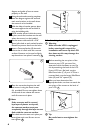
4 Final installation and operation
4.1 Final installation
1
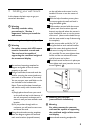
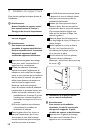
To complete the installation, simply slide
the arm piece with your LCD attached
into the wall piece. The plastic tab on
the top of the wall piece should click
indicating that the arm piece is secure.
2
If you need to remove the arm piece,
push in on the tab and slide the arm up.
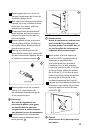
3 For additional security and stability,
insert the security bolt (F) into the
hole located on base of the arm piece
and tighten using the Allen Wrench (G)
provided.
5
5
B Warning
Insert the safety screw at the
bottom of the mount to avoid
having the display accidentally
knocked off the mount.
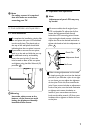
4.2 Operation and adjustment
D
Note
Adjustment of your LCD may vary
by model.
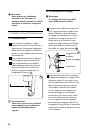
1 On most models, the tilt angle of your
LCD is adjustable. To adjust the tilt, first
locate the adjustment knob directly
behind the LCD mounting point. Loosen
it by turning the knob counter- clockwise.
Adjust the tilt to the desired level and re-
tighten the knob to lock the adjustment in
place.
6
3ODVWLF7DE
$GMXVWPHQW.QRE
6HW6FUHZ
6
2 Other viewing adjustments can be made
by simple moving the arm into the desired
position. If you find that a joint is too tight
or too loose, you can adjust the tightness
of that joint. To do this, first examine the
joint If your mount includes an adjustment
knob at the joint, turn the knob clockwise
to tighten and counter-clockwise to
loosen. If your mount does not have a
knob, use the allen wrench (G) from your
hardware kit to tighten or loosen the nut
at the joint.