5
Getting Started
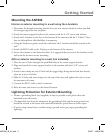
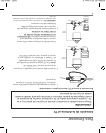
Mounting the ANT806
Interior or exterior mounting to a wall using the L-brackets.
1. Determine the desired mounting location for your new antenna based on where you find
the strongest signal for best reception.
2. Attach the center support bracket to the antenna with the 6 1/8” screws and washers.
3. Attach the L-brackets to the slots in the bottom of the antenna with the 2 U-bolts. These
slots are adjustable to offer flexibility in mounting.
4. Using the brackets as guides, mark the wall where the L-brackets should be secured to the
wall.
5. Attach the RG59 cable to the F fitting on the bottom of the antenna.
6. Secure the antenna to the desired location. It is suggested that you secure the brackets to the
wall studs for the most secure mounting.
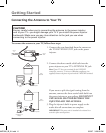
Attic or exterior mounting to a mast (not included).
1. Place the two U-bolts through the predrilled holes in the center support bracket.
2. Align and attach the center support bracket to the antenna with the 6 1/8” screws and
washers.
3. Attach a mast clamp on each U-bolt with the jagged edge facing inward and then loosely
place the nuts on the bolts.
4. Slide the U-bolts and mast clamps over the top of the mast and tighten the nuts to secure
the antenna to the mast.
5. Connect the RG59 cable to the F-connector.
6. Raise the mast and secure it at the desired location.
Lightning Protection for Exterior Mounting
• Mount a grounding block (not supplied) as close as possible to the point where the
downlead enters the house.
• The downlead wire from the antenna to the grounding block and the mast ground wire
should be secured to the house with stand-off insulators, spaced four to six feet apart.
• If you’re using a metal mast, consider using a ground rod to get proper grounding for
lightning.