


38 Chapter 4 Using the TV’s Menu
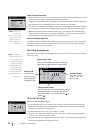
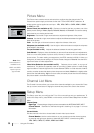
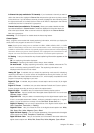
Picture Menu
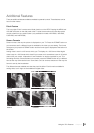
The Picture menu contains menus and controls to configure how the picture looks. The
Picture menu options apply to the video for the main TV and VIDEO INPUT selections. All
picture options can be applied to each input - VID1, VID2, CMP1 or CMP2, HDMI1, HDMI2
or HDMI3, and PC.
Picture Preset (not available on PC) Displays a choice list that lets you select one of the
preset picture settings: Vibrant, Sports, Personal, Natural, or Cinematic. Choose the setting
that is best for your viewing environment.
Brightness Use the left or right arrow buttons to adjust the brightness of the picture.
Contrast Use the left or right arrow buttons to adjust the difference between the light and dark
areas of the picture.
Color Use the right or left arrow buttons to adjust the richness of the color.
Sharpness (not available on PC) Use the right or left arrow buttons to adjust the crispness
of the edges in the picture.
Tint (not available on PC) Adjusts the balance between the red and green levels.
Color Warmth Displays a choice list that lets you set one of three automatic color adjustments:
Cool for a more blue palette of picture colors; Normal; or Warm for a more red palette of
picture colors. The warm setting corresponds to the NTSC standard of 6500 K. When you
change any of these picture settings, the Picture Preset changes to Personal. Use the left or
right arrow button to make adjustments.
Video Noise Reduction (not available on PC) Reduces picture “static” or any type of
interference. This feature is especially useful for providing a clearer picture in weak analog
signal conditions. Press the right arrow to choose between: Off for no noise reduction; Low for
a softer, smoother picture that retains picture sharpness and detail; Medium for a slightly softer
picture than the Low setting; High for an even softer, smoother picture than the other settings
(the picture detail is somewhat decreased).
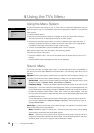
Channel List Menu
The Channel List menu allows you to view all the channels available in your channel list. Press
the up or down arrow button to highlight a channel then press OK to tune to the channel.
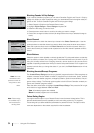
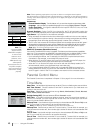
Setup Menu
The Setup menu lets you configure the TV to fit its surroundings and your preferences. To
access the Setup menu, press MENU on the remote, and then select Setup from the Main
Menu.
Channel Setup
Signal Type Choose the type of signal you have connected to the ANTENNA/CABLE INPUT.
Channel Search Searches for channels the signal is receiving. Go to page 17 for more
information.
List and Labels
Edit the channels in the list or choose labels for each video input channel.
Channel Number Use the number buttons on your remote to enter the channel number,
or press left and right arrow buttons to select the VIDEO INPUT channel among VID1,
VID2, CMP1, CMP2, PC, HDMI1, HDMI2 and HDMI3.
Note: Video
noise reduction is
available for the
CMP1 and CMP2
inputs only if the
signal is 480i.
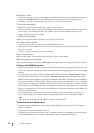
Picture
Go Back
Picrure Preset Vibrant
Brightness
Contrast
Color
Sharpness
Tint
Color Warmth Normal
Video Noise Reduction Low
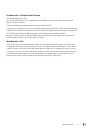
Setup
Go Back
Channel Setup
List and Lables
Autotuning
Closed Caption
Prefereces
Dynamic Backlight Off
Light Sensor Off
HDMI CEC Off