


4. Repeat the Manual Code Search and Entry Method. Each time a code turns the
component on or off, you have found a code that operates the remote and needs
to be tested for maximum functionality. Continue through the code lists, cycling
through the codes you have already tried, until you find one that offers
maximum functionality.
Auto Code Search and Entry
The Auto Code Search and Entry Method enables the remote to automatically search
through all the codes in the Code Lists for the one that operates your component.
Example used is for TV component set up.
Note: The Auto Code Search method may take a long time because the remote
searches through all of the codes in its memory. Therefore, if your brand is listed in
the Brand Codes or the Code Lists, first try the Brand Code Search or the Direct
Code Entry method.
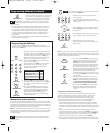
Throughout the programming of each key, be sure to keep the remote pointed
at the IR sensor of the component you are currently programming the remote to control.
!
TIP
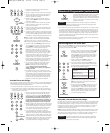
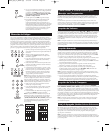
1. Manually turn on the component you want the
remote to control.
2. Press and hold the component key you wish to
program. The illuminated component name turns on
and remains on.
3. While holding the component key down, press and
hold the ON·OFF key. The illuminated component
name turns off.
4. After holding down both keys for three seconds, all
of the component names illuminate and stay on.
5. Release both keys. The name of the current
component remains lit, while all other component
names turn off.
!
TIP
To exit without saving at any point in the Auto
Code Search, press and release the CLEAR key.
(LIGHT
ON)
(LIGHT
OFF)
(NAMES LIGHT UP)
(STAYS LIT)
Note:
If you press an invalid key during Auto Code Search, the illuminated
component name blinks four times and turns off. The last programmed code under
that component key is retained.
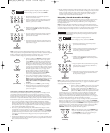
6. Press and release the PLAY key, then wait five seconds to
see if your component turns off. If your component does
not respond, continue to press the PLAY key every five
seconds until your component turns off. Each time you
press the PLAY key, the illuminated component name
blinks ten times and a block of 10 codes is sent to your component. This process
continues until all of the codes in the Code Lists have been searched. (If your
component has not turned off after all codes have been searched, the illuminated
component name blinks four times and turns off. The Auto Code Search Entry
method is exited.)
7. When your component turns off, you know the correct code is in the last block of
10 codes sent. Press and release the REVERSE key. Wait two seconds to see if
your component turns on again. If your component does not respond, continue to
press the REVERSE key every two seconds until your component turns on again.
This will isolate the correct code in the last block of codes sent. Each time the
REVERSE key is pressed, the illuminated component name blinks.
Note: If you accidentally press the REVERSE key after
your component responds, press and release the
FORWARD key. Then, wait two seconds to see if your
component turns off again.
(NAME BLINKS)
8. Once your component turns on, you have found
the correct code. Save the new code by pressing and
releasing the STOP key. The illuminated component
name turns off. You must press the STOP key
to save the code or the correct code will not
be stored!
9. When you press the STOP key, the code is stored.
10.To confirm that the component key is programmed
with the correct code for maximum functionality, test
the component. If some of the features of your
component do not work, different codes in the list
can be tried until you find the code that allows the
remote to control the majority of your component’s
functions. See the section entitled “Testing the Code
for Maximum Functionality.”
(LIGHT
OFF)
Once you’ve programmed the remote to control your components, record the codes
for future reference. If you used the Direct Code Entry method, just make a note of
the codes you programmed in the boxes below. If you used one of the Code Search
methods to program your remote or if you used the Direct Entry method but don’t
remember the code, you need to retrieve each component’s four-digit code. Noting
the actual code will save you time if you ever need to program the remote again
(e.g., if programming is lost when you change the batteries). If the codes are
recorded, you can use the Direct Entry method to reprogram your remote to control
your components, which is quick and easy.
Code Retrieval
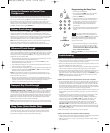
1. Press and hold the component key whose code you
wish to retrieve. The illuminated component name
turns on.
2. While holding the component key down, press
and hold the INFO key. The illuminated component
name turns off.
3. After holding down both keys for three seconds,
all of the component names illuminate and stay on.
4. Release both keys. The name of the current
component remains lit, while all other component
names turn off.
5. Starting with the number 1 key, press and release
each number key in the following order (1-9, then 0).
The number that causes the illuminated component
name to blink is the first number of the code. As you
find each number of the code, write them down for
future reference.
Note:All TV codes begin with the number 1; all VCR
and DVR codes begin with the number 2; all DVDs,
the number 3; all AUDIO, the number 4; all satellite
receivers and cable boxes, the number 5; all HDTVs,
the number 7.
6. Repeat step 5 until you have retrieved all four
numbers in the code.
7. After the fourth number is retrieved, the illuminated
component name blinks briefly, then turns off.
8. To exit the Code Retrieval Mode, press and release
the CLEAR key at any time.
Note: If you press an invalid key during the Code
Retrieval process, the remote will not respond. If you
do not press a valid Code Retrieval key (
TV, DVD,
VCR·AUX, SAT·CBL, INFO, GO BACK
), Code Retrieval
times out after 15 seconds. The illuminated component
name blinks four times, and then turns off.
(LIGHT
OFF)
(NAMES LIGHT UP)
(NAME BLINKS)
(LIGHT
OFF)
8
9
TV CODE
1
VCR CODE
DVD CODE
3
SAT·CBL CODE
5
SAT CBL
2
AUDIO CODE
4
DVR CODE
2
RCR860_NA_IB_REVA.qxp 3/13/06 3:29 PM Page 8