


Chapter 4: On-Screen Menus
Chapter 4 27
If you ever need to change some of the
settings in any of the menus that appear
in the setup procedure, choose Setup
(press 4 on the remote) from the VCR
MAIN MENU.
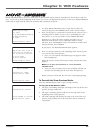
Explanation of the Menu System
The on-screen menus you saw the first time you turned on your VCR
were explained in Chapter 1. This chapter lists other menus that you
can access through the VCR MAIN MENU (press MENU on the remote
control). The quickest way to select a menu is to press the number
button on the remote control that matches the number next to the
item. Some menus have on-screen instructions for more complicated
settings.
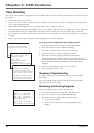
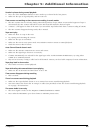
VCR MAIN MENU
1 Timer Recordings
2 Time
3 Channels
4 Setup
5 Preferences
6 Audio
7 Language
0 Exit
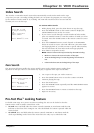
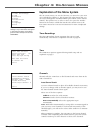
TIME
1 Set Time and Date
2 Auto Clock Set: ON
3 Set Time Zone
4 Set Daylight Saving
Time Data was found
on channel 20.
0 Exit
Timer Recordings
The Timer Recordings feature programs the VCR to record
automatically. This feature is explained in detail on page 18.
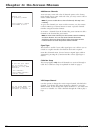
Channels
Channels tells the VCR where to find channels and stores them in the
VCR’s channel list.
Auto Channel Search
Use Auto Channel Search to place all available channels in memory.
If you ever change cable or antenna signals, you may need to run
the Auto Channel Search feature again.
Select one of the three options:
Cable TV searches for cable stations.
Antenna searches for local broadcast stations.
Detect Automatically selects the appropriate input
automatically.
Note: With Detect Automatically, a strong cable or antenna signal in
your area may cause channels to be detected inaccurately. If this
should happen, you will need to select either Cable TV or Antenna
manually.
When scanning is complete, the VCR tunes to the lowest channel
available. After completing Auto Channel Search, press the remote
control’s CHAN up or down buttons to select active channels.
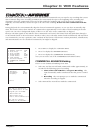
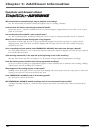
CHANNELS
1 Auto Channel Search
2 Add/Remove Channels
3 Signal Type: CABLE
4 Cable Box Setup
5 VCR Output Channel: 3
0 Exit
Time
The TIME menu options appeared during initial setup and are
explained on page 9.