


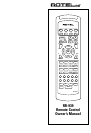
REMOTE CONTROL RR-939
mands can be memorized to be replayed automatically
with the press of a MACRO button. See the section, PRO-
GRAMMING MACROS, for more detailed information.
Note: Macro buttons are available only in the AUD, SAT,
and CBL modes. However, you can include switching to a
different DEVICE mode as part of a macro, in order to op-
erate other components.
To replay a MACRO, first activate one of the DEVICE
modes (AUD, SAT, and CBL only). Then, press the desired
MACRO button. If a macro has been programmed for that
button, the RR-939 will replay the memorized sequence of
commands and the DEVICE button will blink red for each
command. If no macro has been programmed, or if mac-
ros are not available in that DEVICE mode, nothing will
happen and no DEVICE buttons will blink.
Special Buttons
4
There are two special function buttons at the bottom of
the RR-939 remote.
The LIGHT button turns on backlighting so you can see
the buttons in a dark room. The lights stay on for 7 sec-
onds and will stay on for an additional 7 seconds each
time another button is pressed.
The SHIFT button activates additional commands for
some buttons. These functions are shown in italics on the
illustrations and in the command tables at the back of this
manual. To activate one of these commands, press and
release the SHIFT button and then press the desired
COMMAND button.
Programming
The RR-939 can replace up to ten different remote con-
trols, one for each of the eight DEVICE buttons. Before
you use it, you must program the RR-939, i.e. tell it which
audio/video components you wish it to control.
The RR-939 contains hundreds of command sets for vari-
ous A/V components. Programming the remote involves
selecting the command sets that correspond to the com-
ponents in your system, and assigning them to the eight
DEVICE buttons by entering a three digit code. This need
only be done once during initial set-up of the RR-939.
5
RR-939
The easiest way to proceed is to find your components
and corresponding three-digit codes from the list of
codes at the end of this manual. If your component is not
listed, there is an alternative auto-search method for find-
ing the right command set.
Three Digit Code Programming
Find your audio/video component in the list at the end of
this manual and note the 3-digit code(s):
Step One: Turn on the component you wish to memorize.
Step Two: Press the corresponding DEVICE button (for ex-
ample, if you are memorizing the command set for a CD
player, press the CD DEVICE button at the top of the
RR-939). While pressing the DEVICE button, simulta-
neously press the MUTE button and hold both for at least
one second. The DEVICE key will light in red for 20 sec-
onds, indicating that you have entered the program mode.
The next step must be done within this 20 second period,
or the RR-939 will revert to its standard operating mode.
Step Three: Point the RR-939 at the audio/video compo-
nent and enter the 3-digit code, using the numeric but-
tons. The DEVICE key will flash each time you enter a
digit. If you have entered the correct code, the compo-
nent will turn off. If there is more than one 3-digit code for
your brand of source component, continue entering addi-
tional 3-digit codes from the list until the component turns
off, indicating that you have found the right one.
Step Four: Store the code number by pressing the corre-
sponding DEVICE button again. The button will blink twice
to confirm the storage of the code in memory.
Step Five: Test the COMMAND buttons, using the tables
at the back of this manual as a reference for the available
functions. If the functions do not work correctly, repeat
the above steps, with the next available 3-digit code from
the list for your brand of component.
Repeat the steps above for each of up to eight compo-
nents, assigning each one to the appropriate DEVICE key.
6