


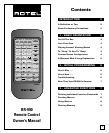

5
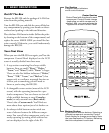
Look at the Standard Edit screen and notice that
the Component Selectors at the bottom are all
blinking. The only item not blinking is the icon
associated with the component Control Panel you
are about to customize.
3. Touch any button you think you won’t need. It
will disappear and you’ll hear a double beep in
confirmation.
4. Made a mistake? Don’t worry - just press the
same point on the LCD touch screen again and
the button will reappear accompanied by a
single confirming beep.
5. Continue this process until you’ve constructed
the ideal Control Panel for the component
you’ve chosen. (Don’t worry about doing it per-
fectly the first time around. You can reenter
Edit mode and reconfigure the Control Panel
any time.)
6. When you’ve finished editing the Control
Panel, simply press the Component Selector
again. The RR-990 will beep three times to
confirm that it is leaving Edit mode and will
show your newly-customized Control Panel.
Congratulations, you did it!
A Shortcut With A Long Explanation
You can edit the SEL 1 and SEL 2 Control Panels
just as you would any other Control Panel (TV, VCR,
CD, etc.). However, SEL 1 and SEL 2 allow you to
quickly configure a Custom Control Panel based on
any of the RR-990’s other Control Panels.
This may be particularly useful if you’ve decided to
use SEL 1, for example, as the Control Panel for an-
other VCR. If this is the case, simply enter into Con-
trol Panel Edit mode for SEL 1 by following steps 1
and 2 above.
When you see the Component Selectors at the bot-
tom of the LCD panel blinking, simply touch the
Component Selector (CD, for example) whose Con-
trol Panel functions are most similar to the one you
need for SEL 1.
You’ll notice that SEL 1’s Control Panel changes im-
mediately into a duplicate of the Control Panel for
the Component Selector you’ve just touched.
Now, just delete unneeded buttons as shown in steps
3, 4, and 5 above until you’re satisfied with your new
creation. Then touch the SEL 1 Component Selec-
tor once again. You’ve just “locked in” your new Cus-
tom Control Panel and left Edit mode.
And it took far less time to do it than to read how,
didn’t it?
2 – INITIAL PROGRAMMING
Now that you’ve gotten to know your way around
the RR-990’s LCD screen, it’s time to get really ad-
venturous and put this knowledge to real use! After
all, this is the reason you bought the RR-990 in the
first place, isn’t it?
Here’s Why . . .
As it comes from the factory, the RR-990 is a lot like
a very precocious 3 year old: It’s got a lot of potential
but it doesn’t know very much. You need to send it to
school. However, in this case, you’re also its teacher.
The RR-990 contains no internal control codes. It is
truly a blank slate: You can point it at anything, press
all the buttons you want, and it will do . . . nothing.
It needs to be programmed first. You’re elected.
Here’s How . . .
1. Gather that confusing pile of remote control-
lers from your coffee table. Place them gently
near the RR-990. Make sure the area you’ve
chosen isn’t in direct sunlight or lighted by very
bright halogen lamps, etc. (The RR-990 learns
best in normal to slightly dim room lighting.)