


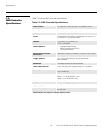
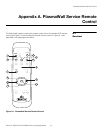
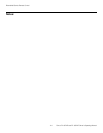


PlasmaWall Service Remote Control
A-2 Runco PL-43DHD and PL-50DHD Owner’s Operating Manual
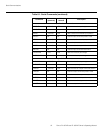
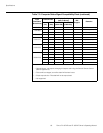
1. ASPECT RATIO
Press this button repeatedly to select a display aspect ratio (this may be necessary
with certain computer resolutions).
2. POWER
Press to cycle the monitor between on and standby.
3. PC/HDTV-1
Selects INPUT 1 (ANALOG RGB IN) on the PlasmaWall.
4. HDTV-2
Selects INPUT 2 (DIGITAL RGB) on the PlasmaWall.
5. INFO
Displays timing information for the current input signal.
6. INSTALLER ADJUST (pin hole)
Used to access the INSTALLER ADJUST menu.
7. MENU
Pressing the MENU button brings up the main menu. Also, if you are in an adjustment
mode or function, pressing MENU brings the menu back one level.
8. UP BUTTON
Use to move the menu cursor up in the On-Screen Display.
9. RIGHT BUTTON
Used to move the menu cursor right in the On Screen Display.
10. LEFT BUTTON
Used to move the menu cursor left in the On Screen Display.
11. DOWN BUTTON
Use to move the menu cursor down in the On-Screen Display.
12. SET BUTTON
When an item is highlighted on the On-Screen Display, the SET button selects the
item.
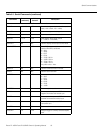
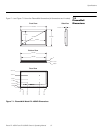
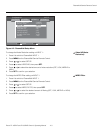
A.2
Service/Setup Menu
For the vast majority of installations, the DHD Controller remote control gives you all the
control you need over display quality settings. However, there are two settings internal to
the PlasmaWall that can improve the displayed image quality on INPUT 1: VIDEO NR
(noise reduction) and MPEG FILTER. These settings can be found in the Setup Menu,
shown in
Figure A-2.
The PlasmaWall service remote control is intended for use only
by authorized Runco dealers. Use it only as described here or as
instructed to by Runco Technical Support.
Note
In order to use the PlasmaWall Service Remote Control, you must
disconnect the PlasmaWall from the DHD Controller and connect a signal
source to INPUT 1 on the PlasmaWall.
Note