English - 63
Auto Wall-Mount (Sold separately)
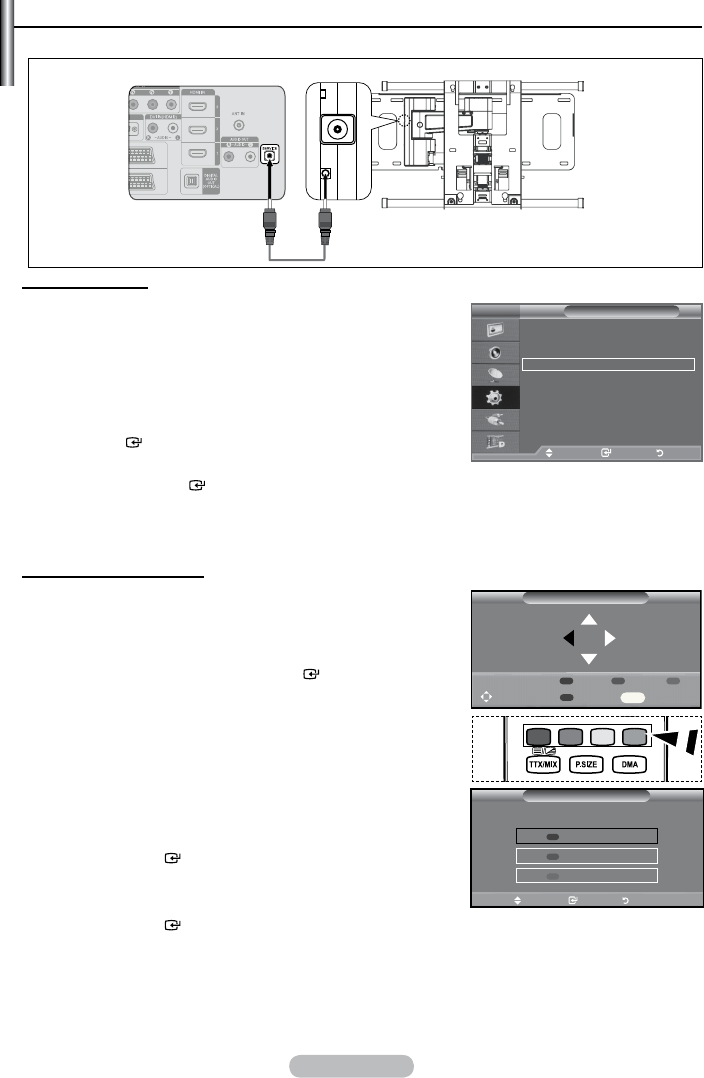
Once the auto wall mount is installed, your TV’s position can be easily adjusted.
Entering the menu
1.
Press the ▲, ▼, ◄ or ► button on your remote control.
The Auto Wall-Mount screen is displayed.
If the Auto Wall-Mount screen is not displayed when
clicking on a direction button while watching your TV, use
the menu to display that screen.
• Press the
MENU button to display the menu.
Press the ▲ or ▼ button to select “Setup”, then press the
ENTER button.
• Press the ▲ or ▼ button to select “
Auto Wall-Mount”, then
press the ENTER button.
Remembering the Position
2.
Adjust to the desired position using the ▲,▼,◄,► buttons.
If you press an arrow button when no OSD is displayed on
the TV screen, the Adjustment screen appears.
Press the INFO button to reset. Press the ◄ or ► button to
select “Yes”, then press the ENTER button.
The position is initialized to the default setting.
3.
Press the blue button.
Press the ▲ and ▼ buttons to select a save mode from either
Position 1, Position 2 or Position 3 in order to save the current
position.
To not save the current position, press the RETURN button.
When selecting a save mode, you cannot use the Colour
buttons.
4.
Press the ENTER button to save.
When Position1 is selected, the message "Current position
saved as Position1" is displayed.
5.
Press the ENTER button.
The saved Position appears on the left side of the OSD.
➣
➣
➣
➣
➣
➣
➣
➣
TV
Setup
Plug & Play
Language : English
Time
Auto Wall-Mount
Melody : Off
Entertainment : Off
Energy Saving : Off
PIP
Move Enter Return
Save
Select a mode to Save.
Position1
Position2
Position3
Move Enter Return
Auto Wall-Mount
Adjust Save Center
Position 1 2 3
INFO
TV Rear Panel
Auto Wall-Mount
SERVICE Cable (Not supplied)
BN68-01684A-00Eng.indd 63 2008-07-02 �� 3:32:31


