


9
E
Forinformationonthetouchpaneldriver,seetheTouchPanelDriverOperationManual.ForinformationonthePenSoftware,
see the Pen Software Operation Manual.
Supplied Components
If any component should be missing, please contact your dealer.
LiquidCrystalDisplayMonitor:1
Remotecontrolunit:1
Cableclamp:2
Powercord:1
R-6battery(“AA”size):2
CD-ROM(UtilityDiskforWindows):1
SetupManual:1
Touchpen:1
* SharpCorporationholdsauthorshiprightstotheUtilityDiskprogram.Donotreproduceitwithoutpermission.
* Forenvironmentalprotection!
Donotdisposeofbatteriesinhouseholdwaste.Followthedisposalinstructionsforyourarea.
Pen tip (for touch pen): 2
Touch pen battery
(LR-03(“AAA”size)):1
USBcable:1
Eraser:1
Tray:1
Traymountingtting
(cover / bracket): x 2
System Requirements
To use the touch panel, the touch panel must be connected to a computer, and the touch panel driver and Pen Software must be
installedonthecomputerfromthesuppliedCD-ROM.Systemrequirementsforeachsoftwareprogramareasfollows.
Computer
PC/ATcompatiblecomputerwithaUSB1.1port(mustbeabletosupplya500mA(5.0V)current)
andabletooutputaresolutionof1920x1080.(CD-ROMdriverequiredforsoftwareinstallation.)
OS
WindowsXP(32-bitor64-bitversion),WindowsVista(32-bitor64-bitversion),Windows7(32-bit
or64-bitversion)
CPU
IntelCeleronorAMDSempron1.6GHzorfaster
IntelCore2DuoorAMDAthlonIIX22.8GHzorfasterrecommended
Memory Atleast2GB(atleast1GBforWindowsXP)
Freespaceonharddrive Atleast100MB(freespaceseparatelyrequiredfordatastorage)
Toconnectthetouchpanelandinstallthetouchpaneldriver,seetheTouchPanelDriverOperationManual.
To install the Pen Software, see the Pen Software Operation Manual.
Contents
IMPORTANT INFORMATION ............................................3
DEAR SHARP CUSTOMER ..............................................5
SAFETY PRECAUTIONS ..................................................5
TIPS AND SAFETY INSTRUCTIONS ...............................7
MOUNTING PRECAUTIONS ............................................8
Supplied Components .....................................................9
System Requirements .....................................................9
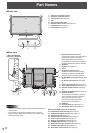
Part Names .....................................................................10
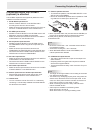
Connecting Peripheral Equipment ...............................12
ConnectionwithaPCorAVequipment .....................12
ConnectionwhenthePN-ZB01(optional)
is attached ..................................................................13
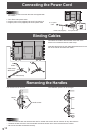
Connecting the Power Cord .........................................14
Binding Cables ...............................................................14
Removing the Handles ..................................................14
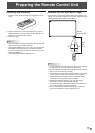
Preparing the Remote Control Unit ..............................15
Installing the batteries ................................................15
Remote control operation range .................................15
Turning Power On/Off ....................................................16
Turning on the main power.........................................16
Turning power on/off ..................................................16
Disablingpoweron/offoperations ..............................17
Touch Pen Preparations/Touch Action ........................18
Inserting the battery ...................................................18
Touch action and touch mode ....................................18
Touch action ...............................................................18
Other functions ...........................................................20
Cautionarypoints .......................................................20
Eraser .........................................................................20
Basic Operation .............................................................21
Menu Items .....................................................................23
Displayingthemenuscreen .......................................23
Menu item details .......................................................24
AdjustmentsforPCscreendisplay ............................30
Initialization (Reset)/Functional Restriction Setting
(FUNCTION) ....................................................................31
Controlling the Monitor with a PC (RS-232C) ..............32
PCconnection ............................................................32
Communicationconditions .........................................32
Communicationprocedure .........................................32
SettingoftheGAMMAuserdata ................................35
RS-232Ccommandtable ...........................................36
Controlling the Monitor with a PC (LAN) .....................43
Settings to connect to a LAN ......................................43
ControllingwithaPC ..................................................45
Troubleshooting .............................................................51
Specications ...............................................................53
Mounting Precautions
(For SHARP dealers and service engineers) ...............57
Traymountingscrews:M5x4/M4x2
Terminallabel:1
Used when installing the interface
expansionboardPN-ZB01(optional).
CoverSharplogo:1
PlacethisstickerontotheSHARPlogoto
cover the logo.